How to Seal Mylar Bags With Clothes Iron 2026: Simple Steps
If you've got a stack of mylar bags and a box of oxygen absorbers sitting on your kitchen table, you're probably wondering if that clothes iron in the closet can actually get the job done. The short answer: yes, it can. Learning how to seal mylar bags with a clothes iron is one of the most accessible entry points into long-term food storage, and you don't need to spend money on a dedicated impulse sealer to do it right.
A clothes iron hits the sweet spot between cost and capability. Most household irons reach 250 to 300 degrees Fahrenheit on their cotton or wool settings, which falls squarely in the range needed to fuse BoPET (biaxially-oriented polyethylene terephthalate) film. That's the material mylar bags are made from.
With the right prep and a few minutes of practice, you can produce seals that hold up for years. Let's walk through exactly how.
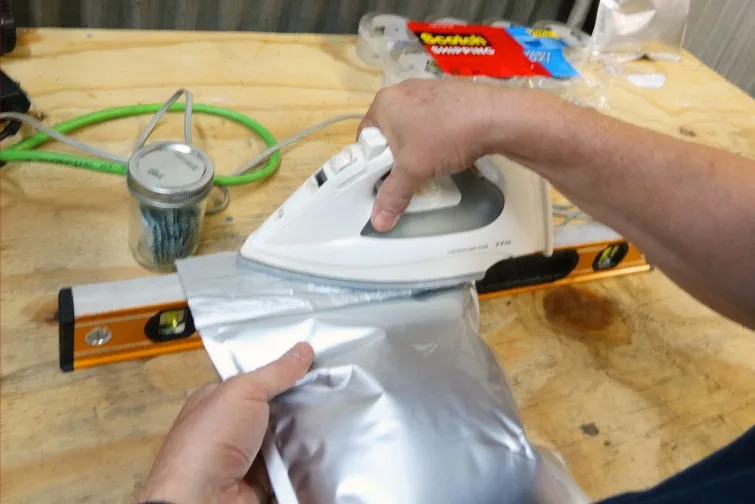
Image source: Bing (Web (fair-use with source credit))
Quick Answer
Set your clothes iron to the cotton or wool setting and turn off the steam. Place the filled mylar bag on a flat, heat-resistant surface. Lay a strip of parchment paper over the open edge.
Press the iron firmly across the seal area for 3 to 5 seconds per section. Let it cool, then inspect the seal for gaps or wrinkles.
What You Need Before You Start
Gather everything before you plug in the iron. Once it's hot, you'll want to move efficiently.
The essentials:
- Mylar bags (3.5 mil minimum thickness for food storage; 5.0 mil or 7.0 mil is better for sharp-edged items like rice)
- A household clothes iron with adjustable temperature settings
- Parchment paper or a brown kraft paper bag (as a barrier between the iron and the mylar)
- Oxygen absorbers sized to your bag volume (300cc for a 1-gallon bag, 500cc for a 2-gallon, 2000cc for a 5-gallon)
- A flat, heat-resistant work surface (a wooden cutting board, ceramic tile, or thick cardboard works)
- Dry goods to store (rice, beans, oats, flour, sugar, freeze-dried food)
A few notes on materials. Mylar bag thickness is measured in mils (thousandths of an inch). Thinner bags around 3.5 mil work fine for short-term storage, but for anything you want to keep 5 to 25 years, go with 5.0 mil or thicker. Oxygen absorbers are single-use and start activating the moment you open their packaging, so have your bags filled and ready before you pull one out.
How to Seal Mylar Bags with a Clothes Iron — Step by Step
This is the core process. Follow each step in order and you'll get a reliable seal the first time.
Step 1: Fill the bag. Pour your dry goods into the mylar bag, leaving 1 to 2 inches of headspace at the top. This gives you room to work the seal without food particles getting in the way.
Step 2: Add the oxygen absorber. Drop it in right before you seal. Don't let it sit in open air for more than 10 to 15 minutes, or it'll start losing its effectiveness.
Step 3: Remove excess air. Press the bag gently from the bottom up to push out as much air as you can. You won't get it perfectly flat like a vacuum sealer would, but get rid of the big pockets.
Step 4: Prep your surface and iron. Set your cutting board or tile on a stable counter. Plug in the iron and set it to the cotton or wool setting. Make sure the steam function is completely off.
Let the iron heat up fully, about 2 to 3 minutes.
Step 5: Lay down the barrier. Place a strip of parchment paper across the top of the bag where you'll make the seal. This keeps the mylar from sticking to the iron's soleplate.
Step 6: Make the seal. Press the iron down firmly on one end of the bag opening. Hold it for 3 to 5 seconds. Lift, move over about half an inch, and press again.
Work your way across the entire width of the bag in overlapping sections. Don't slide the iron. Press, lift, move, press again.
Step 7: Let it cool. Leave the bag on the surface for 30 to 60 seconds before touching the seal. The bond sets as it cools.
Step 8: Inspect and test. Run your fingers along the seal line. It should look like a single, consistent band with no gaps, bubbles, or wrinkled channels. Give the bag a gentle squeeze.
If you hear or feel air escaping, reseal that section.
How to Tell If Your Seal Actually Worked
A bad seal looks almost identical to a good one at first glance. Here's what to actually check for.
Visual inspection. Hold the bag up to a light source. A proper seal shows a smooth, slightly translucent band where the two layers of mylar have fused together. If you see dark lines, cloudy patches, or areas where the layers are still separate, that section didn't seal.
The squeeze test. Press the bag gently with both hands. Listen for hissing. Feel for air movement.
Even a tiny leak will let you know. If the bag holds pressure and feels tight, you're good.
The wrinkle check. Wrinkles in the seal area are the number one cause of slow leaks. They create micro-channels where oxygen and moisture can creep through over time. If the seal line has folds or creases, it's worth redoing that section.
What a good seal looks like. The fused area should be roughly 1/4 inch to 1/2 inch wide and uniform from one end to the other. It may look slightly lighter or shinier than the rest of the bag. That's normal.
Image source: Bing (Web (fair-use with source credit))
The Biggest Mistakes People Make (And How to Avoid Them)
Most seal failures come down to a handful of avoidable errors. Here are the ones that trip people up most often.
Leaving the steam on. This is the single most common mistake. Steam introduces moisture into the seal area, and moisture prevents the mylar layers from fusing properly. Double-check that steam is off before you start.
Not using a barrier. Without parchment paper, the mylar can stick to the iron's soleplate. It melts, tears, and ruins the bag. Always use a barrier.
Sliding the iron instead of pressing. Dragging the iron across the bag creates uneven pressure and wrinkles. Use a press-and-lift motion. Firm, stationary pressure gives the most consistent results.
Sealing over food debris. Even a few grains of rice in the seal area can create a channel for air to pass through. Wipe the inside of the bag opening with a dry cloth before sealing if anything got on it.
Using too high a temperature. If the iron is set to the linen or max setting, you risk melting straight through the mylar. Cotton or wool is the sweet spot. If the bag warms up and starts to shrink or distort, your iron is too hot.
Not letting the seal cool. The bond is still forming as the mylar cools. Moving or handling the bag too soon can weaken the seal. Give it a full minute before you pick it up.
Skipping the oxygen absorber. A good seal keeps air out, but the oxygen absorber removes the residual oxygen trapped inside the bag. Without it, you're only solving half the problem.
Iron Settings, Temperatures, and Timing — What Actually Matters
Getting the temperature right is the difference between a seal that lasts decades and one that fails in weeks. Here's what the specs tell us.
Mylar (BoPET film) begins to soften around 250 degrees Fahrenheit and fully bonds in the 275 to 300 range. Most household irons hit about 260°F on the wool setting and roughly 300°F on cotton. Linen or max settings can push past 400°F, which is too hot and will melt through the bag.
Recommended iron settings:
| Setting | Approx. Temp | Suitable? |
|---|---|---|
| Wool | 250-275°F | Yes, may need slightly longer contact |
| Cotton | 275-300°F | Ideal for most mylar bags |
| Linen/Max | 350-450°F | No, too hot, will damage the bag |
Timing matters just as much as temperature. Three to five seconds of firm pressure per section is the standard window. Less than three seconds and the layers won't fully fuse.
More than five and you risk warping or thinning the material.
If your iron has a non-stick soleplate, you're in better shape. Traditional metal soleplates can develop rough spots or residue that creates uneven heat distribution. A quick wipe with a damp cloth before you start helps.
Parchment Paper, Barrier Layers, and Why You Need One
Skipping the barrier layer is one of those shortcuts that always backfires. Here's what the parchment paper actually does.
Mylar film softens when heated. Press a hot iron directly on it and the film will bond to the soleplate instead of to itself. You'll tear the bag, ruin the seal, and possibly damage your iron.
Parchment paper acts as a heat-permeable barrier. It lets enough thermal energy through to fuse the mylar layers without letting them stick to the iron.
What works as a barrier:
- Parchment paper (the most common choice)
- Brown kraft paper bag (cut flat)
- A thin cotton cloth (less ideal, can scorch)
What doesn't work:
- Wax paper (melts at lower temperatures)
- Aluminum foil (conducts heat unevenly, can create hot spots)
- Plastic wrap (will melt onto everything)
Cut your parchment strip about 2 inches wide and long enough to cover the full width of the bag opening. Lay it flat across the seal area right before you press the iron down. You can reuse the same strip for multiple bags as long as it's not torn or covered in melted residue.
Image source: Bing (Web (fair-use with source credit))
Clothes Iron vs. Impulse Sealer vs. Hair Straightener — Which Method Wins?
The clothes iron isn't the only DIY option, and it's not always the best one. Here's how the three most common methods stack up.
Clothes iron. The most accessible tool for most households. It gives you a wide seal area and decent temperature control. The downside is consistency.
It takes practice to apply even pressure across the full width of the bag. Best for people sealing bags occasionally or on a tight budget.
Impulse sealer. A dedicated tool that sends a burst of heat through a wire strip when you press the lever. It produces a narrow but extremely consistent seal in about 2 seconds. No barrier paper needed.
The tradeoff is cost. Entry-level models start around $40 and go up from there. Best for anyone sealing more than a few bags at a time.
Hair straightener. Works on the same principle as an impulse sealer but on a smaller scale. The ceramic plates heat evenly and the narrow jaw makes it easy to control. The seal width is limited, usually about 1/8 inch, which is narrower than ideal for long-term storage.
Best for small bags or single-serve portions.
| Factor | Clothes Iron | Impulse Sealer | Hair Straightener |
|---|---|---|---|
| Cost | Already owned | $40-$150+ | Already owned |
| Seal width | 1/4 to 1/2 inch | 1/8 to 1/4 inch | 1/8 inch |
| Consistency | Moderate | High | Moderate |
| Learning curve | Medium | Low | Low |
| Best for | Occasional use | Batch sealing | Small bags |
If you're sealing 20 or more bags in a session, an impulse sealer pays for itself in time saved. For a handful of bags a few times a year, the iron gets the job done just fine.
Image source: Bing (Web (fair-use with source credit))
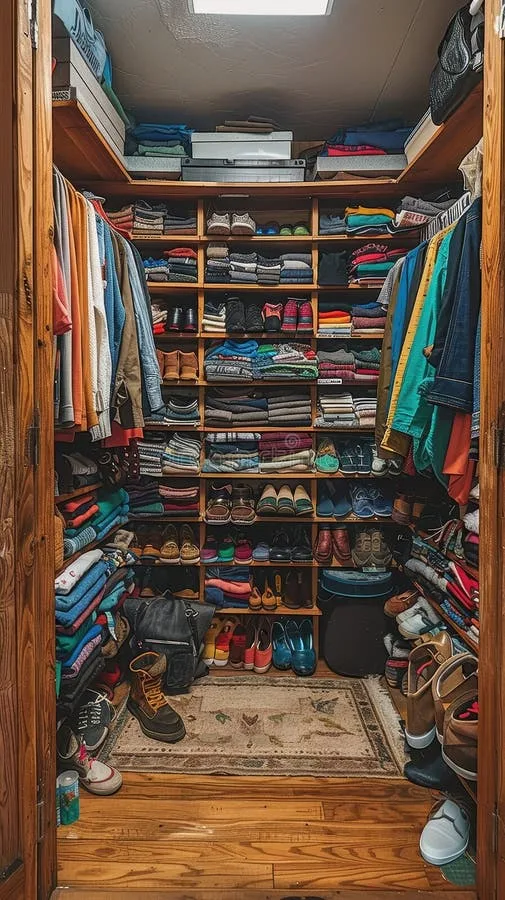
Best Practices for Long-Term Food Storage in Mylar Bags
Sealing the bag is only half the equation. What you put inside and how you store it afterward determines whether your food actually lasts.
Use the right oxygen absorber for the bag size. Too small and it won't scavenge all the oxygen. Too large and it's wasted. A 300cc absorber handles a 1-gallon bag.
Step up to 500cc for 2-gallon bags and 2000cc for 5-gallon bags. For quart-sized bags, 100cc is sufficient.
Only store low-moisture foods. Mylar and oxygen absorbers work by creating an oxygen-free, dry environment. Foods with more than 10% moisture content can spoil or grow botulism in that environment. Stick to rice, beans, oats, pasta, sugar, salt, freeze-dried foods, and dehydrated items.
Don't try to store brown rice, nuts, or anything with residual oil. The oils go rancid even without oxygen.
Label everything. Write the contents and the date on each bag with a permanent marker. Six months from now you won't remember which bag has lentils and which has black beans.
Store bags in a cool, dark place. Heat and UV light degrade both the mylar and the food inside. A closet, pantry, or basement shelf works well. Avoid garages or attops where temperatures swing.
Keeping storage below 70°F significantly extends shelf life.
Stack bags carefully. Mylar is puncture-resistant but not puncture-proof. Don't stack heavy bags on top of lighter ones with sharp-edged contents. Food-grade 5-gallon buckets are a popular way to store sealed mylar bags.
They add a layer of physical protection and make stacking easy.
Safety Tips Most Guides Skip
Working with a hot iron and thin plastic film comes with a few risks that don't always make it into the instructions.
Burns are the obvious one. The iron soleplate stays hot for several minutes after you unplug it. Keep it on a heat-resistant surface and away from the edge of the counter. Keep kids and pets out of the workspace while you're sealing.
Ventilation matters more than people think. Mylar doesn't release dangerous fumes at normal sealing temperatures, but if you accidentally overheat it past 400°F, the film can release small amounts of volatile compounds. Work in a room with decent airflow. Open a window or turn on a range hood if you're sealing a large batch.
Don't seal near water. This sounds obvious, but people set up on kitchen counters near the sink. Water and a plugged-in clothes iron are a bad combination. Keep your work area dry.
Oxygen absorbers aren't toxic, but they're not food. Handle them with dry hands. Don't open the pack until you're ready to use them. If the contents spill, sweep them up and discard them.
They're iron-based and safe in the quantities used for food storage, but you don't want to ingest the powder directly.
Unplug the iron when you're done. Not when you think you might be done. When you're actually finished. It's easy to get distracted labeling bags or moving things around and forget the iron is still sitting there hot.
Troubleshooting: When Your Seals Keep Failing
Even with the right setup, seals sometimes don't cooperate. Here's how to diagnose the most common problems.
Seal won't stick at all. Your iron probably isn't hot enough. Make sure it's set to cotton or wool and give it a full 2 to 3 minutes to heat up. If the mylar looks unchanged after 5 seconds of pressure, bump the setting up one notch.
Melted holes in the bag. Too much heat or too much time. Drop to the wool setting and reduce your press time to 3 seconds. If your iron runs hot even on lower settings, try placing two layers of parchment paper as a buffer.
Wavy or wrinkled seal line. This happens when the bag shifts during sealing or when you slide the iron instead of pressing straight down. Hold the bag firmly with one hand while you press with the other. Use a textured cutting board underneath to keep the bag from sliding.
Seal holds but leaks at the corners. Corners are tricky because the bag folds create extra layers. Go over each corner twice with the iron, and make sure your seal extends all the way to the very edge of the bag.
Oxygen absorber gets hot after sealing. That's normal. It's doing its job, reacting with the residual oxygen inside the bag. If the bag starts to collapse inward over the next few hours, that's a good sign.
It means the absorber is working and your seal is holding.
Frequently Asked Questions
Can you use any clothes iron to seal mylar bags?
Most household irons work as long as they have adjustable temperature settings and a dry (non-steam) mode. Steam irons are fine, just make sure the steam function is turned off. Travel irons and cordless irons usually don't get hot enough or maintain consistent heat, so they're not ideal.
How long do mylar bags sealed with an iron actually last?
With a proper seal and the right oxygen absorber, dry goods stored in mylar bags can last 10 to 25 years. The seal method (iron vs. impulse sealer) matters less than the seal quality. A well-done iron seal is just as effective as a machine seal.
Do you need oxygen absorbers if the seal is airtight?
Yes. A good seal keeps outside air out, but there's still oxygen trapped inside the bag when you seal it. Oxygen absorbers remove that residual oxygen.
Without them, oxidation and insect activity can still degrade your food over time.
What thickness mylar bag should I use with a clothes iron?
For most dry goods, 4.0 mil to 5.0 mil is the sweet spot. Thinner bags (3.5 mil) work but are more prone to punctures and harder to seal without overheating. Thicker bags (7.0 mil) need slightly more heat and pressure, which can be tricky with a standard iron.
Can you reseal a mylar bag if the first attempt fails?
Yes. Cut the sealed edge off, dump the contents back in, add a fresh oxygen absorber, and reseal. Just make sure the new seal area is clean and dry.
You can't reseal over an old failed seal line, though. Always cut below it and start fresh.