How to Make a Fabric Wreath in 2026 (What Actually Works)
Making a fabric wreath sounds simple enough until you're standing in the craft store staring at ten types of fabric and wondering which one won't turn into a frayed, lopsided mess. The good news is, it's genuinely one of the most forgiving DIY crafts you can tackle, even if you've never made one before.
Fabric wreaths are affordable, typically costing $10 to $25 in materials for a standard 14-inch wreath at the time of this writing, meaning you're saving 60 to 90 percent compared to pre-made retail options. Let's break down exactly how to make one that looks intentional and polished, starting with the materials that actually matter.
Image source: Bing (Web (fair-use with source credit))
Quick Answer
Strip fabric into rectangles, typically 2 by 6 inches. Tie each strip around a wire wreath frame using a simple knot. Work in one direction around the frame.
Fluff and adjust strips until the frame is fully hidden. Add a bow or embellishment if desired. Total build time runs 1 to 3 hours.
Choosing the Right Fabric, Frame, and Style for Your Project
Before you pick anything up off the shelf, it's worth understanding how your choices affect the finished wreath. Fabric type, frame size, and attachment style all determine whether your wreath looks bushy and full or sparse and wispy.
Fabric Types Compared: Burlap, Cotton, Linen, Chiffon, and More
The fabric you choose sets the whole character of the wreath. Here's how the most common options compare in practice.
| Fabric Type | Look & Feel | Best For | Fraying Tendency |
|---|---|---|---|
| Burlap | Rustic, stiff, textured | Farmhouse, fall, outdoor-themed wreaths | Moderate |
| Cotton | Soft, versatile, easy to work with | Year-round, seasonal, beginner projects | High (loose weaves) |
| Linen | Elegant, slightly textured, refined | Minimalist, modern, neutral decor | Moderate |
| Chiffon / Tulle | Sheer, lightweight, airy | Spring, wedding, delicate styles | Low |
| Velvet | Rich, dense, luxurious | Winter, Christmas, formal decor | Low |
| Flannel | Cozy, soft, warm | Fall, winter, cabin-style wreaths | Moderate |
Cotton is the most versatile and widely available, but it frays more than other options. If you're working with cotton, plan to either seal the edges with a product like Fray Check or accept a slightly more rustic, frayed look. Burlap holds its shape well and gives that farmhouse character, but it sheds fibers everywhere during construction.
Keep a lint roller nearby.
Frame Sizes and Gauges: What Works Best for Your Wreath Size
Wire wreath frames come in diameters from 10 inches up to 24 inches. The most common sizes for front door wreaths are 14, 16, and 18 inches. Gauge refers to the thickness of the wire, with 16-gauge being sturdier and 18-gauge being lighter and easier to bend.
For a standard front door, a 16-inch frame hits the sweet spot. It's large enough to make an impression without overwhelming the door or requiring an unreasonable number of fabric strips. If you're making a wreath for a mantel or interior wall, 12 or 14 inches usually works better.
Matching Wreath Style to Your Space and Season
Think about where the wreath will live before you choose your fabric palette. A bright, bold plaid flannel reads completely different from a neutral linen blend. Seasonal wreaths tend to follow predictable color schemes, fall calls for burnt orange, burgundy, and olive, while spring leans toward pastels and whites.
But there's no rule saying you have to follow the calendar. A well-made neutral fabric wreath in linen or cotton can hang year-round without looking out of place.
Step-by-Step: How to Build a Fabric Wreath From Start to Finish
This is where the project comes together. The process is straightforward, but a few technique details make the difference between a wreath that looks handmade with care and one that looks like a craft store clearance bin.
Cutting and Preparing Your Fabric Strips
Consistency matters more than perfection here. You want your strips roughly the same size so the finished wreath looks even. The standard dimensions are 2 inches wide by 6 to 7 inches long.
Wider strips, say 2.5 or 3 inches, create a fuller, chunkier look. Narrower strips around 1.5 inches give a more delicate, refined appearance.
Image source: Wikimedia Commons / The Portable Antiquities Scheme, Julian Watters, 2005-12-19 17:47:13 (CC BY-SA)
For a 14-inch wreath, you'll need roughly 80 to 120 strips depending on how full you want it and how wide you cut them. That translates to about 1 to 1.5 yards of fabric. A rotary cutter and cutting mat speed this up significantly compared to scissors, but scissors work fine if you're patient.
If you're using cotton or another fabric that frays easily, consider sealing the edges before you start tying. A quick pass with Fray Check along each cut edge prevents unraveling over time. For synthetic fabrics like chiffon, a very brief pass with a lighter melts the edge and stops fraying instantly.
Just be careful with natural fibers like cotton, they can catch fire rather than melt.
The Knotting Method: Attaching Strips to the Frame
The knotting method is the most common and most durable way to attach fabric to a wire frame. It's simple, it holds up over time, and it doesn't require any glue.
Here's how it works. Fold one fabric strip in half lengthwise. Place the folded loop behind the wire frame.
Pull the loose ends through the loop and tighten. That's it. Each strip takes about 10 seconds once you get into a rhythm.
Image source: Bing (Web (fair-use with source credit))
Work in one direction around the frame, placing each strip right next to the previous one. Don't space them out. You want them snug against each other so the frame doesn't show through.
If you're mixing colors or patterns, alternate them as you go rather than grouping all of one color together. This prevents clumping and gives the wreath a more balanced, intentional look.
Some crafters prefer the lazy loop method, where you simply drape the strip over the frame and tie a single knot underneath. It's faster but less secure. The fold-and-loop method described above holds up better over time, especially on wreaths that get moved around or exposed to wind on a covered porch.
Shaping, Fluffing, and Fixing Gaps
Once all your strips are attached, step back and look at the wreath from a few feet away. You'll almost certainly spot gaps where the frame peeks through. This is normal.
Go back and add extra strips to those spots, tucking them in between existing ones.
Fluffing is the step most beginners skip, and it's the step that makes the biggest visual difference. Gently pull and separate each strip, fanning it out so the wreath looks full and rounded rather than flat and compressed. If your wreath looks lopsided, shift some strips toward the thinner side to even things out.
Adding a Bow, Monogram, or Embellishments
A bow at the top or bottom is the classic finishing touch. Wire-edged ribbon holds its shape better than standard ribbon and lets you adjust the loops after tying. You can attach the bow with floral wire, hot glue, or by threading a pipe cleaner through the back and twisting it around the frame.
Beyond bows, popular embellishments include wooden monogram letters, small faux flowers, seasonal ornaments, or a small sign. Keep the total weight in mind. A wreath that's too heavy won't hang flat against the door and may damage lightweight command hooks.
Creating a Hanger and Hanging It Properly
Loop a piece of ribbon, twine, or floral wire around the top back of the wreath and tie it securely. This is your hanger loop. For front doors, an over-the-door wreath hanger is the simplest option.
It requires no nails and won't damage the door. If you're using a command hook, check the weight rating on the package. Standard command hooks hold 1 to 8 pounds, and most fabric wreaths weigh between 0.5 and 2 pounds.
Visual Cues: What a Good Fabric Wreath Looks Like at Every Stage
Since this is a visual craft, understanding what "right" looks like at each stage helps more than any written description can. Here's what to watch for.
How to Spot Even Coverage vs. Patchy Spots
A finished fabric wreath should look uniformly full from every angle. If you can see the wire frame through the strips, it needs more fabric. Patchy spots usually happen when strips are spaced too far apart or when they shift during the tying process.
The fix is simple: add more strips to the thin areas and fluff existing ones to fill the gaps.
What Fullness Looks Like — and When to Stop Adding Strips
There's a point of diminishing returns. A wreath that's too dense looks stiff and overstuffed, and it also gets heavy. You want the strips to have some movement and flow.
When the frame is completely hidden and the wreath has a rounded, pillowy shape, you're done. For most people, that happens around 90 to 110 strips on a 14-inch frame.
Color Placement: Avoiding Clumping and Achieving Balance
If you're using two or three colors, the instinct is often to group them in sections. Resist that. Alternating colors as you tie creates a more cohesive, professional look.
Think of it like mixing ingredients into dough rather than layering them. The goal is even distribution, not blocks of color.
Common Mistakes That Ruin Fabric Wreaths (and How to Fix Them)
Even experienced crafters run into these issues. Here are the most common problems and how to address them.
- Fraying strips during construction. Loose-weave fabrics like cotton muslin unravel as you handle them. Seal edges before cutting, or embrace the frayed look as part of the rustic charm.
- Wreath looks flat after tying. This almost always means the strips haven't been fluffed. Pull each strip apart, fan it out, and separate the layers. It takes five minutes and transforms the finished look.
- Strips slipping off the frame. Smooth fabrics like satin and chiffon don't grip the wire well. Switch to the fold-and-loop knotting method, or add a small dab of hot glue at the base of each strip for extra security.
- Wreath is too heavy to hang. Velvet, thick burlap, and heavy embellishments add up fast. If your wreath feels heavy in your hands, it's too heavy for a standard door hook. Use a sturdier hanger or reduce the number of strips.
- Colors bleeding after exposure to moisture. This happens with dyed cottons and cheaper fabrics, especially on covered porches that get humidity exposure. Choose colorfast fabrics or apply a fabric protector spray before assembly.
- Wreath frame bending under weight. This is a problem with 18-gauge frames loaded with heavy fabric. Step up to a 16-gauge frame for anything over 16 inches in diameter.
- Hot glue strings visible on the finished product. If you use hot glue, pull off the strings before they harden. A quick pass with a hair dryer softens them enough to peel away cleanly.
Fabric Wreath vs. Grapevine, Deco Mesh, and Faux Floral: Which Is Right for You?
Fabric wreaths aren't the only option on the block. Here's how they stack up against the most common alternatives.
Image source: Bing (Web (fair-use with source credit))
| Feature | Fabric Wreath | Grapevine Wreath | Deco Mesh Wreath | Faux Floral Wreath |
|---|---|---|---|---|
| Cost to make | $10–$25 | $15–$30 | $15–$35 | $25–$60+ |
| Difficulty | Beginner | Beginner to intermediate | Beginner | Intermediate to advanced |
| Weight | Light (0.5–2 lbs) | Medium to heavy | Light to medium | Medium |
| Durability | 3–5+ years | 2–4 years | 2–4 years | 3–5+ years |
| Best for | Year-round, any style | Rustic, natural | Bold, dramatic | Realistic, polished |
| Customizability | Very high | Moderate | High | Moderate |
Fabric wreaths win on cost, weight, and versatility. Gravine wreaths have a natural, organic look but are heavier and harder to customize. Deco mesh creates big, dramatic volume but can look over-the-top if you're not careful.
Faux floral wreaths look the most realistic but cost significantly more and require more skill to assemble well.
If you're making your first wreath, fabric is the most forgiving material to learn on. Mistakes are easy to fix, materials are cheap, and the finished product looks good even when it's not perfect.
Who Should Make a Fabric Wreath — and When It's Worth It
Best Use Cases: Seasonal Decor, Gifts, Craft Fairs, and Memory Keepsakes
Fabric wreaths make the most sense when you want something custom without spending a fortune. They're ideal for seasonal front door rotations, where you swap out a fall wreath in October and a Christmas wreath in December. They also make genuinely meaningful gifts, especially memory wreaths made from a loved one's old clothing.
That kind of personalization is something no store-bought wreath can match.
If you're selling at craft fairs, fabric wreaths have strong margins. A wreath that costs $12 in materials sells for $45 to $80 at most markets, depending on size and embellishments. They're also lightweight and easy to transport compared to grapevine or heavy floral wreaths.
When Buying Pre-Made Makes More Sense
If you need a wreath by tomorrow and don't have time to make one, buying is the obvious call. Pre-made fabric wreaths from retailers run $60 to $200 or more, and the quality varies wildly. If you're not craft-inclined or you need something very specific, like a large 24-inch wreath with professional-grade embellishments, buying may be the smarter move.
But if you've got a free afternoon and $15 to spend, making your own is almost always worth it. You get exactly the colors and style you want, and you'll have enough materials left over to make a second one.
What It Actually Costs: Materials, Time, and How Much You Save
Here's a realistic breakdown of what you'll spend on a standard 14-inch fabric wreath.
| Item | Estimated Cost |
|---|---|
| Fabric (1–2 yards) | $5–$15 |
| Wire wreath frame (14") | $2–$5 |
| Ribbon for bow | $2–$5 |
| Embellishments (optional) | $3–$8 |
| Total | $12–$33 |
That compares to $60 to $200 for a comparable store-bought fabric wreath. Even on the high end of materials, you're saving at least 50 percent.
Time-wise, expect 1 to 3 hours for your first wreath. Cutting strips takes the most time, about 30 to 45 minutes for 100 strips. Tying them on takes another 45 minutes to an hour.
Shaping and adding embellishments fills out the rest. Once you've made two or three, you'll cut that time in half.
Pro Tips From Experienced Crafters
These are the small details that separate a good wreath from a great one.
- Mix two fabric types in one wreath. Burlap and cotton together create depth and visual interest that a single fabric can't match.
- Cut strips with a rotary cutter and self-healing mat. It's faster than scissors and gives you cleaner, more consistent edges.
- Wrap your frame with floral wire or ribbon before tying strips. This gives the strips more grip and prevents slipping, especially with smooth fabrics.
- Work on a flat surface, not in your lap. Laying the wreath on a table lets you see the shape developing and catch gaps early.
- Use a color wheel if you're mixing colors. Complementary colors, blue and orange, purple and yellow, create the most visual pop. Analogous colors, blue, teal, green, create a calmer, more cohesive look.
- Store wreaths in large plastic bins with tissue paper. This prevents crushing and keeps dust off between seasons. A wreath stored properly lasts 5 years or more.
Storing and Maintaining Your Fabric Wreath Year After Year
Fabric wreaths are durable, but they need a little care between seasons. Before storing, give the wreath a gentle shake outside to remove dust and debris. If it's really dirty, a quick pass with a fabric steamer or a light vacuum with a brush attachment cleans it up without damaging the strips.
Store wreaths in a rigid container, not a garbage bag. Compression flattens the strips and ruins the shape. Large plastic bins with lids work well.
Tuck tissue paper or bubble wrap around the wreath to hold its form. Keep the bin in a cool, dry place. Attics with extreme heat can fade colors over time, and damp basements encourage mildew.
When you pull the wreath out next season, it'll probably need a few minutes of fluffing to look its best again. That's normal. Just pull the strips apart, reshape the bow, and it's ready to hang.
Frequently Asked Questions
How long does it take to make a fabric wreath?
A standard 14-inch wreath takes 1 to 3 hours for a beginner. Experienced crafters can finish in 45 minutes to 1.5 hours. Cutting strips is the most time-consuming part.
What size wire frame should I use for a front door?
16 inches is the most popular size for front doors. It's large enough to be visible from the sidewalk without overwhelming the door. For double doors or large entryways, go up to 18 or 20 inches.
Can I use old clothing instead of buying fabric?
Absolutely. Old cotton t-shirts, dresses, curtains, and even tablecloths work well. T-shirt wreaths are one of the most popular upcycled versions.
Just make sure the fabric isn't too thin or stretched out.
Do I need a hot glue gun to make a fabric wreath?
No. The knotting method doesn't require any glue at all. Hot glue is optional and mainly used for attaching embellishments like bows, flowers, or ornaments.
Will a fabric wreath survive on an uncovered porch?
Most fabric wreaths are best suited for covered areas like a porch overhang or indoors. Direct rain, wind, and sunlight degrade fabric over time. If you want an outdoor wreath, choose weather-resistant fabrics like synthetic burlap and apply a fabric protector spray.
How many fabric strips do I need for a 14-inch wreath?
Plan on 80 to 120 strips at the standard 2 by 6 inch size. The exact number depends on how full you want the wreath and how wide you cut your strips.
Why Fabric Wreaths Need More Than Written Instructions
This is a craft where seeing really is believing. Written steps can tell you what to do, but they can't show you what "full enough" looks like, how tight to pull each knot, or why one wreath looks polished while another looks like a pile of rags tied to a hoop. That's the gap this guide is designed to close.
The difference between a wreath you're proud to hang and one you shove in the back of the closet comes down to visual judgment. You need to know what good coverage looks like at the halfway point versus the finished point. You need to see how fabric drapes when it's cut on the bias versus the grain.
These are things a photo or diagram communicates instantly that a paragraph of text can't.
Quick Answer: What You Actually Need to Make a Fabric Wreath
Strip fabric into rectangles, typically 2 by 6 inches. Tie each strip around a wire wreath frame using a simple knot. Work in one direction around the frame.
Fluff and adjust strips until the frame is fully hidden. Add a bow or embellishment if desired. Total build time runs 1 to 3 hours.
Choosing the Right Fabric, Frame, and Style for Your Project
Before you pick anything up off the shelf, it's worth understanding how your choices affect the finished wreath. Fabric type, frame size, and attachment style all determine whether your wreath looks bushy and full or sparse and wispy.
Fabric Types Compared: Burlap, Cotton, Linen, Chiffon, and More
The fabric you choose sets the whole character of the wreath. Here's how the most common options compare in practice.
| Fabric Type | Look & Feel | Best For | Fraying Tendency |
|---|---|---|---|
| Burlap | Rustic, stiff, textured | Farmhouse, fall, outdoor-themed wreaths | Moderate |
| Cotton | Soft, versatile, easy to work with | Year-round, seasonal, beginner projects | High (loose weaves) |
| Linen | Elegant, slightly textured, refined | Minimalist, modern, neutral decor | Moderate |
| Chiffon / Tulle | Sheer, lightweight, airy | Spring, wedding, delicate styles | Low |
| Velvet | Rich, dense, luxurious | Winter, Christmas, formal decor | Low |
| Flannel | Cozy, soft, warm | Fall, winter, cabin-style wreaths | Moderate |
Cotton is the most versatile and widely available, but it frays more than other options. If you're working with cotton, plan to either seal the edges with a product like Fray Check or accept a slightly more rustic, frayed look. Burlap holds its shape well and gives that farmhouse character, but it sheds fibers everywhere during construction.
Keep a lint roller nearby.
Frame Sizes and Gauges: What Works Best for Your Wreath Size
Wire wreath frames come in diameters from 10 inches up to 24 inches. The most common sizes for front door wreaths are 14, 16, and 18 inches. Gauge refers to the thickness of the wire, with 16-gauge being sturdier and 18-gauge being lighter and easier to bend.
For a standard front door, a 16-inch frame hits the sweet spot. It's large enough to make an impression without overwhelming the door or requiring an unreasonable number of fabric strips. If you're making a wreath for a mantel or interior wall, 12 or 14 inches usually works better.
Matching Wreath Style to Your Space and Season
Think about where the wreath will live before you choose your fabric palette. A bright, bold plaid flannel reads completely different from a neutral linen blend. Seasonal wreaths tend to follow predictable color schemes, fall calls for burnt orange, burgundy, and olive, while spring leans toward pastels and whites.
But there's no rule saying you have to follow the calendar. A well-made neutral fabric wreath in linen or cotton can hang year-round without looking out of place.
Step-by-Step: How to Build a Fabric Wreath From Start to Finish
This is where the project comes together. The process is straightforward, but a few technique details make the difference between a wreath that looks handmade with care and one that looks like a craft store clearance bin.
Cutting and Preparing Your Fabric Strips
Consistency matters more than perfection here. You want your strips roughly the same size so the finished wreath looks even. The standard dimensions are 2 inches wide by 6 to 7 inches long.
Wider strips, say 2.5 or 3 inches, create a fuller, chunkier look. Narrower strips around 1.5 inches give a more delicate, refined appearance.
Image source: Wikimedia Commons / The Portable Antiquities Scheme, Julian Watters, 2005-12-19 17:47:13 (CC BY-SA)
For a 14-inch wreath, you'll need roughly 80 to 120 strips depending on how full you want it and how wide you cut them. That translates to about 1 to 1.5 yards of fabric. A rotary cutter and cutting mat speed this up significantly compared to scissors, but scissors work fine if you're patient.
If you're using cotton or another fabric that frays easily, consider sealing the edges before you start tying. A quick pass with Fray Check along each cut edge prevents unraveling over time. For synthetic fabrics like chiffon, a very brief pass with a lighter melts the edge and stops fraying instantly.
Just be careful with natural fibers like cotton, they can catch fire rather than melt.
The Knotting Method: Attaching Strips to the Frame
The knotting method is the most common and most durable way to attach fabric to a wire frame. It's simple, it holds up over time, and it doesn't require any glue.
Here's how it works. Fold one fabric strip in half lengthwise. Place the folded loop behind the wire frame.
Pull the loose ends through the loop and tighten. That's it. Each strip takes about 10 seconds once you get into a rhythm.
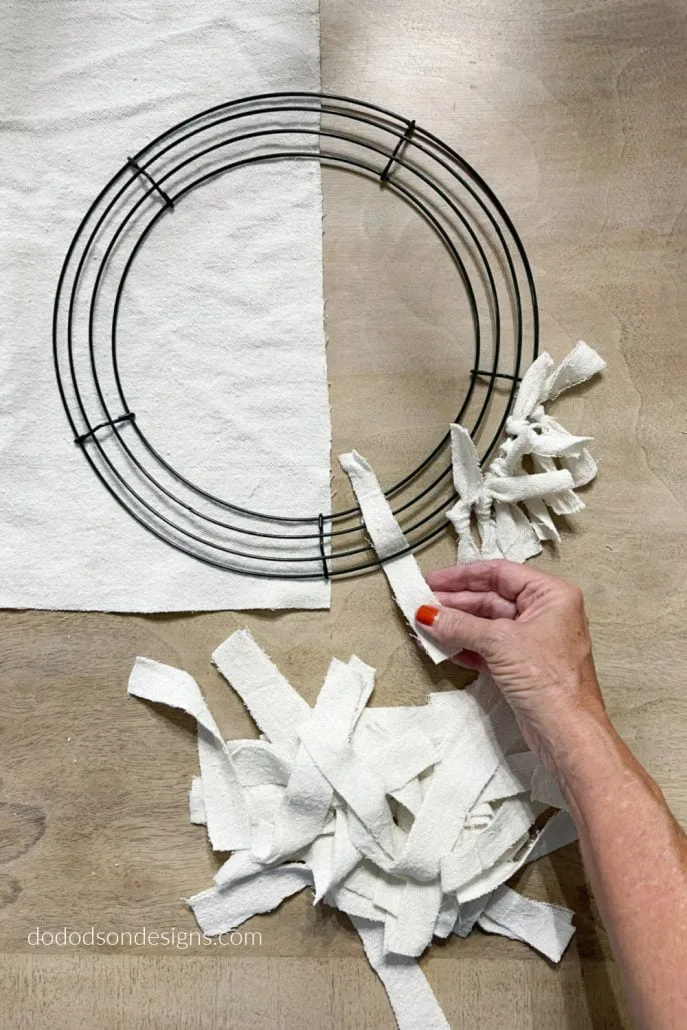
Image source: Bing (Web (fair-use with source credit))
Work in one direction around the frame, placing each strip right next to the previous one. Don't space them out. You want them snug against each other so the frame doesn't show through.
If you're mixing colors or patterns, alternate them as you go rather than grouping all of one color together. This prevents clumping and gives the wreath a more balanced, intentional look.
Some crafters prefer the lazy loop method, where you simply drape the strip over the frame and tie a single knot underneath. It's faster but less secure. The fold-and-loop method described above holds up better over time, especially on wreaths that get moved around or exposed to wind on a covered porch.
Shaping, Fluffing, and Fixing Gaps
Once all your strips are attached, step back and look at the wreath from a few feet away. You'll almost certainly spot gaps where the frame peeks through. This is normal.
Go back and add extra strips to those spots, tucking them in between existing ones.
Fluffing is the step most beginners skip, and it's the step that makes the biggest visual difference. Gently pull and separate each strip, fanning it out so the wreath looks full and rounded rather than flat and compressed. If your wreath looks lopsided, shift some strips toward the thinner side to even things out.
Adding a Bow, Monogram, or Embellishments
A bow at the top or bottom is the classic finishing touch. Wire-edged ribbon holds its shape better than standard ribbon and lets you adjust the loops after tying. You can attach the bow with floral wire, hot glue, or by threading a pipe cleaner through the back and twisting it around the frame.
Beyond bows, popular embellishments include wooden monogram letters, small faux flowers, seasonal ornaments, or a small sign. Keep the total weight in mind. A wreath that's too heavy won't hang flat against the door and may damage lightweight command hooks.
Creating a Hanger and Hanging It Properly
Loop a piece of ribbon, twine, or floral wire around the top back of the wreath and tie it securely. This is your hanger loop. For front doors, an over-the-door wreath hanger is the simplest option.
It requires no nails and won't damage the door. If you're using a command hook, check the weight rating on the package. Standard command hooks hold 1 to 8 pounds, and most fabric wreaths weigh between 0.5 and 2 pounds.
Visual Cues: What a Good Fabric Wreath Looks Like at Every Stage
Since this is a visual craft, understanding what "right" looks like at each stage helps more than any written description can. Here's what to watch for.
How to Spot Even Coverage vs. Patchy Spots
A finished fabric wreath should look uniformly full from every angle. If you can see the wire frame through the strips, it needs more fabric. Patchy spots usually happen when strips are spaced too far apart or when they shift during the tying process.
The fix is simple: add more strips to the thin areas and fluff existing ones to fill the gaps.
What Fullness Looks Like — and When to Stop Adding Strips
There's a point of diminishing returns. A wreath that's too dense looks stiff and overstuffed, and it also gets heavy. You want the strips to have some movement and flow.
When the frame is completely hidden and the wreath has a rounded, pillowy shape, you're done. For most people, that happens around 90 to 110 strips on a 14-inch frame.
Color Placement: Avoiding Clumping and Achieving Balance
If you're using two or three colors, the instinct is often to group them in sections. Resist that. Alternating colors as you tie creates a more cohesive, professional look.
Think of it like mixing ingredients into dough rather than layering them. The goal is even distribution, not blocks of color.
Common Mistakes That Ruin Fabric Wreaths (and How to Fix Them)
Even experienced crafters run into these issues. Here are the most common problems and how to address them.
- Fraying strips during construction. Loose-weave fabrics like cotton muslin unravel as you handle them. Seal edges before cutting, or embrace the frayed look as part of the rustic charm.
- Wreath looks flat after tying. This almost always means the strips haven't been fluffed. Pull each strip apart, fan it out, and separate the layers. It takes five minutes and transforms the finished look.
- Strips slipping off the frame. Smooth fabrics like satin and chiffon don't grip the wire well. Switch to the fold-and-loop knotting method, or add a small dab of hot glue at the base of each strip for extra security.
- Wreath is too heavy to hang. Velvet, thick burlap, and heavy embellishments add up fast. If your wreath feels heavy in your hands, it's too heavy for a standard door hook. Use a sturdier hanger or reduce the number of strips.
- Colors bleeding after exposure to moisture. This happens with dyed cottons and cheaper fabrics, especially on covered porches that get humidity exposure. Choose colorfast fabrics or apply a fabric protector spray before assembly.
- Wreath frame bending under weight. This is a problem with 18-gauge frames loaded with heavy fabric. Step up to a 16-gauge frame for anything over 16 inches in diameter.
- Hot glue strings visible on the finished product. If you use hot glue, pull off the strings before they harden. A quick pass with a hair dryer softens them enough to peel away cleanly.
Fabric Wreath vs. Grapevine, Deco Mesh, and Faux Floral: Which Is Right for You?
Fabric wreaths aren't the only option on the block. Here's how they stack up against the most common alternatives.
Image source: Bing (Web (fair-use with source credit))
| Feature | Fabric Wreath | Grapevine Wreath | Deco Mesh Wreath | Faux Floral Wreath |
|---|---|---|---|---|
| Cost to make | $10–$25 | $15–$30 | $15–$35 | $25–$60+ |
| Difficulty | Beginner | Beginner to intermediate | Beginner | Intermediate to advanced |
| Weight | Light (0.5–2 lbs) | Medium to heavy | Light to medium | Medium |
| Durability | 3–5+ years | 2–4 years | 2–4 years | 3–5+ years |
| Best for | Year-round, any style | Rustic, natural | Bold, dramatic | Realistic, polished |
| Customizability | Very high | Moderate | High | Moderate |
Fabric wreaths win on cost, weight, and versatility. Grapevine wreaths have a natural, organic look but are heavier and harder to customize. Deco mesh creates big, dramatic volume but can look over-the-top if you're not careful.
Faux floral wreaths look the most realistic but cost significantly more and require more skill to assemble well.
If you're making your first wreath, fabric is the most forgiving material to learn on. Mistakes are easy to fix, materials are cheap, and the finished product looks good even when it's not perfect.
Who Should Make a Fabric Wreath — and When It's Worth It
Best Use Cases: Seasonal Decor, Gifts, Craft Fairs, and Memory Keepsakes
Fabric wreaths make the most sense when you want something custom without spending a fortune. They're ideal for seasonal front door rotations, where you swap out a fall wreath in October and a Christmas wreath in December. They also make genuinely meaningful gifts, especially memory wreaths made from a loved one's old clothing.
That kind of personalization is something no store-bought wreath can match.
If you're selling at craft fairs, fabric wreaths have strong margins. A wreath that costs $12 in materials sells for $45 to $80 at most markets, depending on size and embellishments. They're also lightweight and easy to transport compared to grapevine or heavy floral wreaths.
When Buying Pre-Made Makes More Sense
If you need a wreath by tomorrow and don't have time to make one, buying is the obvious call. Pre-made fabric wreaths from retailers run $60 to $200 or more, and the quality varies wildly. If you're not craft-inclined or you need something very specific, like a large 24-inch wreath with professional-grade embellishments, buying may be the smarter move.
But if you've got a free afternoon and $15 to spend, making your own is almost always worth it. You get exactly the colors and style you want, and you'll have enough materials left over to make a second one.
What It Actually Costs: Materials, Time, and How Much You Save
Here's a realistic breakdown of what you'll spend on a standard 14-inch fabric wreath.
| Item | Estimated Cost |
|---|---|
| Fabric (1–2 yards) | $5–$15 |
| Wire wreath frame (14") | $2–$5 |
| Ribbon for bow | $2–$5 |
| Embellishments (optional) | $3–$8 |
| Total | $12–$33 |
That compares to $60 to $200 for a comparable store-bought fabric wreath. Even on the high end of materials, you're saving at least 50 percent.
Time-wise, expect 1 to 3 hours for your first wreath. Cutting strips takes the most time, about 30 to 45 minutes for 100 strips. Tying them on takes another 45 minutes to an hour.
Shaping and adding embellishments fills out the rest. Once you've made two or three, you'll cut that time in half.
Pro Tips From Experienced Crafters
These are the small details that separate a good wreath from a great one.
- Mix two fabric types in one wreath. Burlap and cotton together create depth and visual interest that a single fabric can't match.
- Cut strips with a rotary cutter and self-healing mat. It's faster than scissors and gives you cleaner, more consistent edges.
- Wrap your frame with floral wire or ribbon before tying strips. This gives the strips more grip and prevents slipping, especially with smooth fabrics.
- Work on a flat surface, not in your lap. Laying the wreath on a table lets you see the shape developing and catch gaps early.
- Use a color wheel if you're mixing colors. Complementary colors, blue and orange, purple and yellow, create the most visual pop. Analogous colors, blue, teal, green, create a calmer, more cohesive look.
- Store wreaths in large plastic bins with tissue paper. This prevents crushing and keeps dust off between seasons. A wreath stored properly lasts 5 years or more.
Storing and Maintaining Your Fabric Wreath Year After Year
Fabric wreaths are durable, but they need a little care between seasons. Before storing, give the wreath a gentle shake outside to remove dust and debris. If it's really dirty, a quick pass with a fabric steamer or a light vacuum with a brush attachment cleans it up without damaging the strips.
Store wreaths in a rigid container, not a garbage bag. Compression flattens the strips and ruins the shape. Large plastic bins with lids work well.
Tuck tissue paper or bubble wrap around the wreath to hold its form. Keep the bin in a cool, dry place. Attics with extreme heat can fade colors over time, and damp basements encourage mildew.
When you pull the wreath out next season, it'll probably need a few minutes of fluffing to look its best again. That's normal. Just pull the strips apart, reshape the bow, and it's ready to hang.
Frequently Asked Questions
How long does it take to make a fabric wreath?
A standard 14-inch wreath takes 1 to 3 hours for a beginner. Experienced crafters can finish in 45 minutes to 1.5 hours. Cutting strips is the most time-consuming part.
What size wire frame should I use for a front door?
16 inches is the most popular size for front doors. It's large enough to be visible from the sidewalk without overwhelming the door. For double doors or large entryways, go up to 18 or 20 inches.
Can I use old clothing instead of buying fabric?
Absolutely. Old cotton t-shirts, dresses, curtains, and even tablecloths work well. T-shirt wreaths are one of the most popular upcycled versions.
Just make sure the fabric isn't too thin or stretched out.
Do I need a hot glue gun to make a fabric wreath?
No. The knotting method doesn't require any glue at all. Hot glue is optional and mainly used for attaching embellishments like bows, flowers, or ornaments.
Will a fabric wreath survive on an uncovered porch?
Most fabric wreaths are best suited for covered areas like a porch overhang or indoors. Direct rain, wind, and sunlight degrade fabric over time. If you want an outdoor wreath, choose weather-resistant fabrics like synthetic burlap and apply a fabric protector spray.
How many fabric strips do I need for a 14-inch wreath?
Plan on 80 to 120 strips at the standard 2 by 6 inch size. The exact number depends on how full you want the wreath and how wide you cut your strips.
Why Fabric Wreaths Need More Than Written Instructions
This is a craft where seeing really is believing. Written steps can tell you what to do, but they can't show you what "full enough" looks like, how tight to pull each knot, or why one wreath looks polished while another looks like a pile of rags tied to a hoop. That's the gap this guide is designed to close.
The difference between a wreath you're proud to hang and one you shove in the back of the closet comes down to visual judgment. You need to know what good coverage looks like at the halfway point versus the finished point. You need to see how fabric drapes when it's cut on the bias versus the grain.
These are things a photo or diagram communicates instantly that a paragraph of text can't.
Quick Answer: What You Actually Need to Make a Fabric Wreath
Strip fabric into rectangles, typically 2 by 6 inches. Tie each strip around a wire wreath frame using a simple knot. Work in one direction around the frame.
Fluff and adjust strips until the frame is fully hidden. Add a bow or embellishment if desired. Total build time runs 1 to 3 hours.
Choosing the Right Fabric, Frame, and Style for Your Project
Before you pick anything up off the shelf, it's worth understanding how your choices affect the finished wreath. Fabric type, frame size, and attachment style all determine whether your wreath looks bushy and full or sparse and wispy.
Fabric Types Compared: Burlap, Cotton, Linen, Chiffon, and More
The fabric you choose sets the whole character of the wreath. Here's how the most common options compare in practice.
| Fabric Type | Look & Feel | Best For | Fraying Tendency |
|---|---|---|---|
| Burlap | Rustic, stiff, textured | Farmhouse, fall, outdoor-themed wreaths | Moderate |
| Cotton | Soft, versatile, easy to work with | Year-round, seasonal, beginner projects | High (loose weaves) |
| Linen | Elegant, slightly textured, refined | Minimalist, modern, neutral decor | Moderate |
| Chiffon / Tulle | Sheer, lightweight, airy | Spring, wedding, delicate styles | Low |
| Velvet | Rich, dense, luxurious | Winter, Christmas, formal decor | Low |
| Flannel | Cozy, soft, warm | Fall, winter, cabin-style wreaths | Moderate |
Cotton is the most versatile and widely available, but it frays more than other options. If you're working with cotton, plan to either seal the edges with a product like Fray Check or accept a slightly more rustic, frayed look. Burlap holds its shape well and gives that farmhouse character, but it sheds fibers everywhere during construction.
Keep a lint roller nearby.
Frame Sizes and Gauges: What Works Best for Your Wreath Size
Wire wreath frames come in diameters from 10 inches up to 24 inches. The most common sizes for front door wreaths are 14, 16, and 18 inches. Gauge refers to the thickness of the wire, with 16-gauge being sturdier and 18-gauge being lighter and easier to bend.
For a standard front door, a 16-inch frame hits the sweet spot. It's large enough to make an impression without overwhelming the door or requiring an unreasonable number of fabric strips. If you're making a wreath for a mantel or interior wall, 12 or 14 inches usually works better.
Matching Wreath Style to Your Space and Season
Think about where the wreath will live before you choose your fabric palette. A bright, bold plaid flannel reads completely different from a neutral linen blend. Seasonal wreaths tend to follow predictable color schemes, fall calls for burnt orange, burgundy, and olive, while spring leans toward pastels and whites.
But there's no rule saying you have to follow the calendar. A well-made neutral fabric wreath in linen or cotton can hang year-round without looking out of place.
Step-by-Step: How to Build a Fabric Wreath From Start to Finish
This is where the project comes together. The process is straightforward, but a few technique details make the difference between a wreath that looks handmade with care and one that looks like a craft store clearance bin.
Cutting and Preparing Your Fabric Strips
Consistency matters more than perfection here. You want your strips roughly the same size so the finished wreath looks even. The standard dimensions are 2 inches wide by 6 to 7 inches long.
Wider strips, say 2.5 or 3 inches, create a fuller, chunkier look. Narrower strips around 1.5 inches give a more delicate, refined appearance.
Image source: Wikimedia Commons / The Portable Antiquities Scheme, Julian Watters, 2005-12-19 17:47:13 (CC BY-SA)
For a 14-inch wreath, you'll need roughly 80 to 120 strips depending on how full you want it and how wide you cut them. That translates to about 1 to 1.5 yards of fabric. A rotary cutter and cutting mat speed this up significantly compared to scissors, but scissors work fine if you're patient.
If you're using cotton or another fabric that frays easily, consider sealing the edges before you start tying. A quick pass with Fray Check along each cut edge prevents unraveling over time. For synthetic fabrics like chiffon, a very brief pass with a lighter melts the edge and stops fraying instantly.
Just be careful with natural fibers like cotton, they can catch fire rather than melt.
The Knotting Method: Attaching Strips to the Frame
The knotting method is the most common and most durable way to attach fabric to a wire frame. It's simple, it holds up over time, and it doesn't require any glue.
Here's how it works. Fold one fabric strip in half lengthwise. Place the folded loop behind the wire frame.
Pull the loose ends through the loop and tighten. That's it. Each strip takes about 10 seconds once you get into a rhythm.
Image source: Bing (Web (fair-use with source credit))
Work in one direction around the frame, placing each strip right next to the previous one. Don't space them out. You want them snug against each other so the frame doesn't show through.
If you're mixing colors or patterns, alternate them as you go rather than grouping all of one color together. This prevents clumping and gives the wreath a more balanced, intentional look.
Some crafters prefer the lazy loop method, where you simply drape the strip over the frame and tie a single knot underneath. It's faster but less secure. The fold-and-loop method described above holds up better over time, especially on wreaths that get moved around or exposed to wind on a covered porch.
Shaping, Fluffing, and Fixing Gaps
Once all your strips are attached, step back and look at the wreath from a few feet away. You'll almost certainly spot gaps where the frame peeks through. This is normal.
Go back and add extra strips to those spots, tucking them in between existing ones.
Fluffing is the step most beginners skip, and it's the step that makes the biggest visual difference. Gently pull and separate each strip, fanning it out so the wreath looks full and rounded rather than flat and compressed. If your wreath looks lopsided, shift some strips toward the thinner side to even things out.
Adding a Bow, Monogram, or Embellishments
A bow at the top or bottom is the classic finishing touch. Wire-edged ribbon holds its shape better than standard ribbon and lets you adjust the loops after tying. You can attach the bow with floral wire, hot glue, or by threading a pipe cleaner through the back and twisting it around the frame.
Beyond bows, popular embellishments include wooden monogram letters, small faux flowers, seasonal ornaments, or a small sign. Keep the total weight in mind. A wreath that's too heavy won't hang flat against the door and may damage lightweight command hooks.
Creating a Hanger and Hanging It Properly
Loop a piece of ribbon, twine, or floral wire around the top back of the wreath and tie it securely. This is your hanger loop. For front doors, an over-the-door wreath hanger is the simplest option.
It requires no nails and won't damage the door. If you're using a command hook, check the weight rating on the package. Standard command hooks hold 1 to 8 pounds, and most fabric wreaths weigh between 0.5 and 2 pounds.
Visual Cues: What a Good Fabric Wreath Looks Like at Every Stage
Since this is a visual craft, understanding what "right" looks like at each stage helps more than any written description can. Here's what to watch for.
How to Spot Even Coverage vs. Patchy Spots
A finished fabric wreath should look uniformly full from every angle. If you can see the wire frame through the strips, it needs more fabric. Patchy spots usually happen when strips are spaced too far apart or when they shift during the tying process.
The fix is simple: add more strips to the thin areas and fluff existing ones to fill the gaps.
What Fullness Looks Like — and When to Stop Adding Strips
There's a point of diminishing returns. A wreath that's too dense looks stiff and overstuffed, and it also gets heavy. You want the strips to have some movement and flow.
When the frame is completely hidden and the wreath has a rounded, pillowy shape, you're done. For most people, that happens around 90 to 110 strips on a 14-inch frame.
Color Placement: Avoiding Clumping and Achieving Balance
If you're using two or three colors, the instinct is often to group them in sections. Resist that. Alternating colors as you tie creates a more cohesive, professional look.
Think of it like mixing ingredients into dough rather than layering them. The goal is even distribution, not blocks of color.
Common Mistakes That Ruin Fabric Wreaths (and How to Fix Them)
Even experienced crafters run into these issues. Here are the most common problems and how to address them.
- Fraying strips during construction. Loose-weave fabrics like cotton muslin unravel as you handle them. Seal edges before cutting, or embrace the frayed look as part of the rustic charm.
- Wreath looks flat after tying. This almost always means the strips haven't been fluffed. Pull each strip apart, fan it out, and separate the layers. It takes five minutes and transforms the finished look.
- Strips slipping off the frame. Smooth fabrics like satin and chiffon don't grip the wire well. Switch to the fold-and-loop knotting method, or add a small dab of hot glue at the base of each strip for extra security.
- Wreath is too heavy to hang. Velvet, thick burlap, and heavy embellishments add up fast. If your wreath feels heavy in your hands, it's too heavy for a standard door hook. Use a sturdier hanger or reduce the number of strips.
- Colors bleeding after exposure to moisture. This happens with dyed cottons and cheaper fabrics, especially on covered porches that get humidity exposure. Choose colorfast fabrics or apply a fabric protector spray before assembly.
- Wreath frame bending under weight. This is a problem with 18-gauge frames loaded with heavy fabric. Step up to a 16-gauge frame for anything over 16 inches in diameter.
- Hot glue strings visible on the finished product. If you use hot glue, pull off the strings before they harden. A quick pass with a hair dryer softens them enough to peel away cleanly.
Fabric Wreath vs. Grapevine, Deco Mesh, and Faux Floral: Which Is Right for You?
Fabric wreaths aren't the only option on the block. Here's how they stack up against the most common alternatives.
Image source: Bing (Web (fair-use with source credit))
| Feature | Fabric Wreath | Grapevine Wreath | Deco Mesh Wreath | Faux Floral Wreath |
|---|---|---|---|---|
| Cost to make | $10–$25 | $15–$30 | $15–$35 | $25–$60+ |
| Difficulty | Beginner | Beginner to intermediate | Beginner | Intermediate to advanced |
| Weight | Light (0.5–2 lbs) | Medium to heavy | Light to medium | Medium |
| Durability | 3–5+ years | 2–4 years | 2–4 years | 3–5+ years |
| Best for | Year-round, any style | Rustic, natural | Bold, dramatic | Realistic, polished |
| Customizability | Very high | Moderate | High | Moderate |
Fabric wreaths win on cost, weight, and versatility. Grapevine wreaths have a natural, organic look but are heavier and harder to customize. Deco mesh creates big, dramatic volume but can look over-the-top if you're not careful.
Faux floral wreaths look the most realistic but cost significantly more and require more skill to assemble well.
If you're making your first wreath, fabric is the most forgiving material to learn on. Mistakes are easy to fix, materials are cheap, and the finished product looks good even when it's not perfect.
Who Should Make a Fabric Wreath — and When It's Worth It
Best Use Cases: Seasonal Decor, Gifts, Craft Fairs, and Memory Keepsakes
Fabric wreaths make the most sense when you want something custom without spending a fortune. They're ideal for seasonal front door rotations, where you swap out a fall wreath in October and a Christmas wreath in December. They also make genuinely meaningful gifts, especially memory wreaths made from a loved one's old clothing.
That kind of personalization is something no store-bought wreath can match.
If you're selling at craft fairs, fabric wreaths have strong margins. A wreath that costs $12 in materials sells for $45 to $80 at most markets, depending on size and embellishments. They're also lightweight and easy to transport compared to grapevine or heavy floral wreaths.
When Buying Pre-Made Makes More Sense
If you need a wreath by tomorrow and don't have time to make one, buying is the obvious call. Pre-made fabric wreaths from retailers run $60 to $200 or more, and the quality varies wildly. If you're not craft-inclined or you need something very specific, like a large 24-inch wreath with professional-grade embellishments, buying may be the smarter move.
But if you've got a free afternoon and $15 to spend, making your own is almost always worth it. You get exactly the colors and style you want, and you'll have enough materials left over to make a second one.
What It Actually Costs: Materials, Time, and How Much You Save
Here's a realistic breakdown of what you'll spend on a standard 14-inch fabric wreath.
| Item | Estimated Cost |
|---|---|
| Fabric (1–2 yards) | $5–$15 |
| Wire wreath frame (14") | $2–$5 |
| Ribbon for bow | $2–$5 |
| Embellishments (optional) | $3–$8 |
| Total | $12–$33 |
That compares to $60 to $200 for a comparable store-bought fabric wreath. Even on the high end of materials, you're saving at least 50 percent.
Time-wise, expect 1 to 3 hours for your first wreath. Cutting strips takes the most time, about 30 to 45 minutes for 100 strips. Tying them on takes another 45 minutes to an hour.
Shaping and adding embellishments fills out the rest. Once you've made two or three, you'll cut that time in half.
Pro Tips From Experienced Crafters
These are the small details that separate a good wreath from a great one.
- Mix two fabric types in one wreath. Burlap and cotton together create depth and visual interest that a single fabric can't match.
- Cut strips with a rotary cutter and self-healing mat. It's faster than scissors and gives you cleaner, more consistent edges.
- Wrap your frame with floral wire or ribbon before tying strips. This gives the strips more grip and prevents slipping, especially with smooth fabrics.
- Work on a flat surface, not in your lap. Laying the wreath on a table lets you see the shape developing and catch gaps early.
- Use a color wheel if you're mixing colors. Complementary colors, blue and orange, purple and yellow, create the most visual pop. Analogous colors, blue, teal, green, create a calmer, more cohesive look.
- Store wreaths in large plastic bins with tissue paper. This prevents crushing and keeps dust off between seasons. A wreath stored properly lasts 5 years or more.
Storing and Maintaining Your Fabric Wreath Year After Year
Fabric wreaths are durable, but they need a little care between seasons. Before storing, give the wreath a gentle shake outside to remove dust and debris. If it's really dirty, a quick pass with a fabric steamer or a light vacuum with a brush attachment cleans it up without damaging the strips.
Store wreaths in a rigid container, not a garbage bag. Compression flattens the strips and ruins the shape. Large plastic bins with lids work well.
Tuck tissue paper or bubble wrap around the wreath to hold its form. Keep the bin in a cool, dry place. Attics with extreme heat can fade colors over time, and damp basements encourage mildew.
When you pull the wreath out next season, it'll probably need a few minutes of fluffing to look its best again. That's normal. Just pull the strips apart, reshape the bow, and it's ready to hang.
Frequently Asked Questions
How long does it take to make a fabric wreath?
A standard 14-inch wreath takes 1 to 3 hours for a beginner. Experienced crafters can finish in 45 minutes to 1.5 hours. Cutting strips is the most time-consuming part.
What size wire frame should I use for a front door?
16 inches is the most popular size for front doors. It's large enough to be visible from the sidewalk without overwhelming the door. For double doors or large entryways, go up to 18 or 20 inches.
Can I use old clothing instead of buying fabric?
Absolutely. Old cotton t-shirts, dresses, curtains, and even tablecloths work well. T-shirt wreaths are one of the most popular upcycled versions.
Just make sure the fabric isn't too thin or stretched out.
Do I need a hot glue gun to make a fabric wreath?
No. The knotting method doesn't require any glue at all. Hot glue is optional and mainly used for attaching embellishments like bows, flowers, or ornaments.
Will a fabric wreath survive on an uncovered porch?
Most fabric wreaths are best suited for covered areas like a porch overhang or indoors. Direct rain, wind, and sunlight degrade fabric over time. If you want an outdoor wreath, choose weather-resistant fabrics like synthetic burlap and apply a fabric protector spray.
How many fabric strips do I need for a 14-inch wreath?
Plan on 80 to 120 strips at the standard 2 by 6 inch size. The exact number depends on how full you want the wreath and how wide you cut your strips.