How to Install Landscape Fabric for 2026: Step-by-Step Guide
How to install landscape fabric is one of those tasks that looks simple on paper but trips people up the moment they unroll the first sheet. Wind catches it, the edges won't stay put, and before you know it you're fighting the fabric more than the weeds. The good news is that with the right prep and a few technique tweaks, you can get it done cleanly in a single afternoon.
The whole process comes down to three things: a smooth, level base, proper overlap at the seams, and enough staples to hold everything in place through rain, frost, and the occasional curious dog. As of 2026, most professional-grade woven landscape fabrics carry a UV-stabilized rating and a tensile strength of 100 to 250 pounds per inch of width, which is what separates a five-year install from a two-season disappointment. Let's walk through exactly how to do it right.
Image source: Bing (Web (fair-use with source credit))
Quick Answer
Clear the area of weeds and debris. Level the soil with a rake. Unroll the landscape fabric and smooth it flat.
Overlap seams by 8 to 12 inches. Secure the edges with landscape staples every 12 to 24 inches. Cut slits around existing plants instead of holes.
Cover the fabric with 2 to 4 inches of mulch.
Core Explanation / How It Works
Landscape fabric is a physical barrier that blocks light from reaching weed seeds, which stops them from germinating. At the same time, quality fabric lets water and air pass through so your plants don't suffocate. Think of it like a breathable rain jacket for your soil.
There are two main types you'll run into. Woven landscape fabric is made from interlaced polypropylene strips. It's stronger, resists tearing, and handles foot traffic better.
Non-woven fabric is bonded together through heat or needle-punching. It's usually cheaper but breaks down faster, especially in direct sun.
Image source: Wikimedia Commons / Dietmar Rabich (CC BY-SA)
The weight of the fabric matters more than most people realize. Budget rolls run around 1.5 ounces per square yard. Professional-grade woven fabric starts at 3.0 ounces and goes up from there.
Heavier fabric resists puncture from roots and rocks, and it holds staples tighter over time.
Permeability is the other spec that counts. Woven fabric typically allows 10 to 12 gallons of water per minute per square foot to pass through. Non-woven fabric varies more widely.
If you're installing over planting beds where drainage matters, woven is the safer bet.
Benefits & Drawbacks / Pros and Cons
Landscape fabric isn't perfect, but when it's the right tool for the job, it works really well. Here's the honest breakdown.
What it does well:
- Cuts weed growth by up to 95% in the first two years
- Reduces how often you need to water, since it slows evaporation
- Keeps decorative rock and gravel from mixing into the soil below
- Prevents erosion on moderate slopes when stapled correctly
- Lasts 5 to 20 years depending on fabric quality and UV exposure
Where it falls short:
- Cheap non-woven fabric degrades in as little as 2 to 3 years in full sun
- Staples can pop out in freeze-thaw cycles, especially in clay soil
- Roots from aggressive plants can grow into the fabric and become tangled
- It's not biodegradable, so removal means hauling away old synthetic material
- If you skip the mulch layer, UV rays break down exposed fabric quickly
The biggest mistake people make is thinking fabric alone is enough. It's the combination of fabric plus 2 to 4 inches of mulch on top that gives you real, long-term weed control. If you're weighing other options, cardboard and newspaper layers work as temporary biodegradable alternatives, though they break down within a single season.
Step-by-Step Process / How to Guide
This is where the job either goes smoothly or turns into an afternoon of frustration. Follow these steps in order and you'll avoid the common headaches.
1. Clear and Prep the Site
Pull every weed you can see, including the roots. Rake out rocks, sticks, and old mulch. If the ground is uneven, use a garden rake to level it.
Fabric follows the contour of the soil underneath, so bumps and dips will show through.
2. Measure and Plan Your Rolls
Measure the total area and add 10 to 15 percent for overlap and waste. A standard 3-by-100-foot roll covers 300 square feet, but once you factor in 8-inch overlaps at every seam, you'll lose some of that. Plan which direction you'll run the rolls so you minimize the number of seams.
3. Unroll and Smooth the Fabric
Start at the highest point of the bed if you're on a slope. Unroll the first sheet and pull it tight enough to remove wrinkles, but don't stretch it so hard that it tears. Smooth it flat with your hands, working from the center outward.
4. Overlap the Seams
When you lay the next roll, overlap the previous one by at least 8 inches. Some pros go up to 12 inches in areas with aggressive weeds. The overlap is where most installs fail, so don't skimp here.
5. Secure the Edges First
Staple along the outer edges every 12 to 24 inches. Use U-shaped landscape staples, at least 6 inches long. In rocky or hard-packed soil, you may need a rubber mallet to drive them in.
If you're working on a slope, anchor the top edge first so gravity doesn't pull the fabric downhill as you work.
Image source: Bing (Web (Web (fair-use with source credit))
6. Cut Around Existing Plants
This is the step where patience pays off. Don't cut a round hole around a plant stem. Instead, make an X-shaped cut or a single slit from the edge of the fabric toward the plant.
Fold the flaps back and tuck them around the base. This keeps the fabric tight against the stem without leaving a gap for weeds.
7. Staple the Field
Once the edges are secure, work across the rest of the fabric. Place staples every 2 to 3 feet in a grid pattern. In windy areas or on slopes, tighten that spacing to every 18 inches.
8. Trim Excess Fabric
Use a sharp utility knife to cut away any fabric that extends past your bed edges. Cut cleanly, leaving about 2 inches tucked under the bed border if you have edging installed.
9. Apply Mulch
Spread 2 to 4 inches of mulch over the entire fabric surface. Wood chips, bark nuggets, or shredded hardwood all work well. The mulch hides the fabric, protects it from UV degradation, and adds another layer of weed suppression.
For gravel or river rock areas, a 2-inch layer of stone is sufficient.
10. Water It In
Give the whole area a good soak. This settles the mulch, helps the fabric conform to the soil surface, and removes any remaining air pockets. Check the staples after watering.
If any have loosened, drive them back in.
Use Cases / Best For / Who It's Right For
Landscape fabric isn't a one-size-fits-all solution. It shines in some situations and causes problems in others.
Best uses:
- Flower beds and ornamental gardens where you won't be digging regularly
- Under gravel pathways and driveways to prevent soil mixing
- Around established shrubs and trees where root systems are already set
- On moderate slopes for erosion control
- Under decking and in hard-to-reach areas where weeding is a pain
Skip it in:
- Vegetable gardens where you rotate crops annually, since you'd be cutting and re-laying fabric every season
- Areas with aggressive spreading plants like mint or bamboo, whose roots will tear through it
- Beds where you plan to add new plants frequently
- Any spot where you want a natural, self-sustaining ecosystem
If you're working on a commercial property or a large municipal project, professional-grade woven fabric rated to ASTM D4759 standards is worth the extra cost. For a small backyard flower bed, a mid-range roll from a home center will do the job fine. The key is matching the fabric weight and type to how much abuse the area will take.
Working with fabric in tight spaces takes some of the same precision you'd use when learning how to find grainline on fabric for sewing projects. The cutting and folding techniques are surprisingly similar.
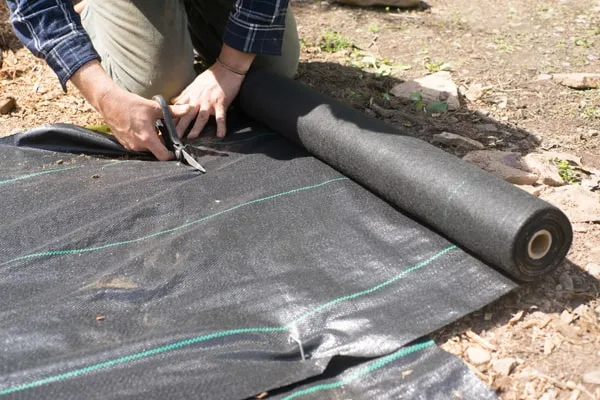
Image source: Bing (Web (fair-use with source credit))