How to Remove Fabric Pilling for 2026: Pro Tips & Tricks
Image source: Bing (Web (fair-use with source credit))
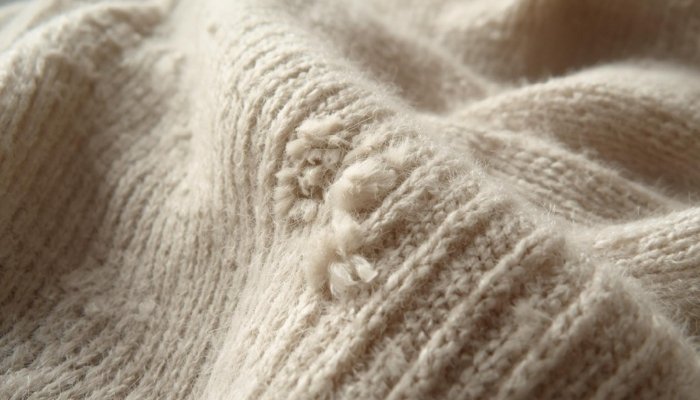
That moment when you pull a favorite sweater out of the closet and it's covered in tiny fuzz balls. Frustrating, right? Learning how to remove fabric pilling properly can bring those pieces back to life without damaging the fibers underneath.
The good news is it's a straightforward process once you know which tool matches your fabric type.
Pilling happens when loose fibers tangle and ball up on the surface through normal wear and friction. It's not a sign your clothes are cheap, it's just physics. Per ASTM D3512 testing standards, even high-quality knits pill over time.
The key is matching your removal method to the fabric you're working with, and that's exactly what we'll walk you through.
Quick Answer
Use an electric fabric shaver for most knits and synthetic fabrics. For delicate fibers like cashmere or merino, try a sweater stone or fine-tooth comb instead. Always lay the garment flat, stretch the fabric gently, and work in small sections with light pressure.
Finish by running a lint roller over the surface to catch any loose fibers.
What Fabric Pilling Actually Is — And Why It Happens
Fabric pilling is what happens when short or loose fibers on a textile surface tangle together into small balls. These are the tiny bobbles you see on sweaters, fleece jackets, and even upholstery. It's not dirt or lint sitting on top.
It's the fabric itself breaking down at the fiber level.
Three things cause pilling. First, mechanical friction. Rubbing against a bag strap, sitting in a chair, or even your arms moving against your sleeves creates enough abrasion to loosen surface fibers.
Second, fiber type. Synthetic fibers like polyester and acrylic pill more than long-staple natural fibers because the short synthetic strands work free more easily. Third, fabric construction.
Loosely knitted fabrics pill faster than tightly woven ones because there's more room for fibers to migrate to the surface.
Pilling tends to concentrate in high-friction zones. Underarms, inner thighs, the sides of sleeves where they rub against your body, and anywhere a bag or seatbelt makes repeated contact. If you've ever noticed your fleece jacket pilling worst along the sides where your arms swing, that's exactly why.
Understanding the cause matters because it tells you something important. Removing the pills fixes the symptom, but changing how you wash and wear the garment addresses the root problem. We'll cover prevention later, but keep this in mind as you work through the removal steps.
The Best Ways to Remove Pills From Clothes (By Fabric Type)
Not every fabric responds to the same treatment. Using a heavy-duty electric shaver on a delicate cashmere pullover will tear through the fibers before the pills even come off. Here's how to match the method to the material.
Synthetic knits and fleece (polyester, acrylic, nylon):
These are the most pill-prone fabrics, and they're also the most forgiving to treat. An electric fabric shaver works perfectly here. The fibers are strong enough to handle the rotating blades without snagging.
Fleece jackets, polyester activewear, and acrylic sweaters all respond well to this method.
Medium-weight natural knits (cotton, standard wool):
A fabric shaver still works, but you want to use a lighter touch. A sweater stone or pumice block is another solid option. It gently abrades the surface pills away without the risk of a blade catching a loose loop.
Cotton sweaters and mid-weight wool pullovers fall into this category.
Delicate natural fibers (cashmere, merino, silk blends, angora):
Go manual. A fine-tooth cashmere comb or a single-blade safety razor gives you the most control. You're working slowly and deliberately, lifting pills off the surface rather than cutting or grinding them away.
Aggressive tools will damage these fabrics fast.
Heavy-duty fabrics (blankets, upholstery, thick fleece):
Electric shavers with a larger head cover ground quickly. You can also use coarse sandpaper (fine-grit, around 220) on flat surfaces like blanket sections. Just test a hidden area first.
Here's a quick reference table:
| Fabric Type | Best Tool | Alternative |
|---|---|---|
| Polyester, acrylic, nylon | Electric fabric shaver | Sweater stone |
| Cotton, standard wool | Sweater stone or pumice | Fabric shaver (light pressure) |
| Cashmere, merino, silk | Cashmere comb or safety razor | Velcro strip (gentle) |
| Fleece, blankets, upholstery | Electric fabric shaver (large head) | Fine-grit sandpaper |
If you're unsure what your garment is made of, check the care label. The fiber content is required by the FTC Care Labeling Rule, so it'll be listed right there. When in doubt, start with the gentest method and work up.
How to Remove Pilling With an Electric Fabric Shaver
The electric fabric shaver is the go-to tool for most people, and for good reason. It's fast, effective, and easy to use once you know the technique. Here's the step-by-step process.
Step 1: Lay the garment flat on a hard surface.
A table or countertop works best. You want the fabric taut and stable. If the garment is bunched or wrinkled, you'll get uneven results and risk cutting into the fabric.
Step 2: Stretch the section you're working on gently.
Use one hand to pull the fabric slightly taut. This raises the pills above the surface and makes them easier to catch. Don't overstretch.
Just enough to smooth out wrinkles and lift the fuzz.
Step 3: Turn on the shaver and hold it flat against the surface.
Don't press down. Let the blade guard rest on the fabric and let the rotating blades do the work. Pressing too hard pushes the fabric into the blades and can cause snags or holes.
Step 4: Move in slow, single-direction passes.
Work in one direction, lifting and repositioning rather than going back and forth. Back-and-forth motion tangles fibers and can pull loops out of the knit. Small sections, maybe three to four inches at a time.
Step 5: Check your progress every few passes.
Stop and look at the fabric. If pills remain, go over the area again. If the fabric looks clean, move on.
Over-shaving thins the material, so stop as soon as the surface is smooth.
Step 6: Empty the pill collection chamber regularly.
Most shavers have a small compartment that fills up fast, especially on heavily pilled garments. If it gets packed, the blades can't spin properly and you'll get poor results.
Step 7: Finish with a lint roller.
This catches any loose fibers the shaver left behind. It's a small step but it makes a noticeable difference in the final look.
If you're working with a delicate fabric, check out our guide on how to use a fabric shaver for more detail on blade guard selection and pressure control. And if you're wondering whether a shaver is safe on specific brands, our article on using a fabric shaver on Lululemon leggings covers that exact scenario.
How to Remove Pilling With a Sweater Stone or Pumice
A sweater stone is a natural or synthetic pumice block designed to gently abrade pills off fabric. It's a favorite for wool, cotton, and blended knits where you want more control than an electric shaver offers.
Step 1: Lay the garment flat and smooth.
Same principle as the shaver method. You need a taut, flat surface to work on.
Step 2: Hold the stone at a slight angle and drag it across the fabric in one direction.
Use light, even pressure. Think of it like erasing pencil marks. You're not scrubbing.
You're gliding the stone across the surface so the abrasive texture catches and breaks apart the pills.
Step 3: Work in small sections.
Three to four inches at a time. Check your progress. The pills will flake away as you go, leaving the intact fibers underneath undisturbed.
Step 4: Brush off the debris.
A soft clothes brush or even your hand will knock loose the pill fragments. Don't skip this. If you leave them, they'll just re-tangle into new pills over time.
Step 5: Repeat as needed for heavier pilling.
For thick mats of pills, you may need several passes. Be patient. Rushing leads to pressing too hard, which can thin the fabric.
The sweater stone method is especially good for garments where you're nervous about using a blade. There's zero risk of cutting or snagging the fabric. The tradeoff is it takes a bit more time and elbow grease.
For a deeper dive into this method, our guide on how to get the fuzz balls off of sweaters walks through several manual techniques.
One thing to watch out for. Sweater stones wear down with use. As the surface smooths out, it becomes less effective.
Most stones last through several garments before you need a replacement. If you notice it's not catching pills like it used to, it's time for a fresh one.
The Razor and Velcro Methods — When They Work And When They Don't
These are the household-hack approaches. They can work in a pinch, but they come with real limitations. Here's the honest breakdown.
The disposable razor method:
A single-blade safety razor or a basic disposable razor can shave pills off fabric. Hold the garment taut, angle the razor at about 30 degrees, and gently scrape across the surface in one direction. The blade catches the pills and slices them off.
This works reasonably well on flat, tightly woven fabrics. It's less effective on loose knits because the blade can catch loops and pull them, creating snags or runs. It's also harder to maintain consistent pressure across a large area.
You'll likely get uneven results on a full sweater.
Use this method when you don't have a fabric shaver handy and the garment isn't something you'd be devastated to damage. It's a backup plan, not a primary tool.
The Velcro method:
Take the hook side of a Velcro strip and press it onto the fabric, then pull away. The hooks grab the pills and pull them off the surface. It sounds clever, and it does remove some surface fuzz.
The problem is it's inconsistent. It catches the loose pills but leaves behind anything that's more firmly anchored. It also doesn't work well on textured or ribbed knits where pills sit in the valleys of the fabric.
And on delicate fibers, the hooks can snag and pull intact loops, making the problem worse.
If you're dealing with light surface fuzz on a sturdy cotton tee, Velcro might take care of it. For anything more serious, you're better off with a proper tool.
When to use these methods:
- You're traveling and don't have your fabric shaver
- The pilling is very light and surface-level
- The fabric is sturdy and tightly constructed
When to avoid them:
- Delicate knits (cashmere, silk, fine merino)
- Loosely woven or open-stitch fabrics
- Large areas of heavy pilling
- Garments with visible loops or texture patterns
Neither method is wrong exactly. They're just limited. If you find yourself reaching for a razor regularly, it's worth investing in a basic electric shaver.
They start around $10 and the results are noticeably better.
What NOT to Use on Delicate Fabrics (Cashmere, Silk, Merino)
Delicate fabrics demand a completely different approach. What works on a polyester fleece will destroy a cashmere pullover in seconds. Here's what to avoid and what to use instead.
Skip the electric shaver on fine knits. The rotating blades are too aggressive for loosely constructed natural fibers. Cashmere, merino wool, silk blends, and angora all have fine, short fibers that a shaver will cut right through, leaving thin spots or holes. Even on a low setting, the risk is too high.
Skip the sweater stone on silk or silk blends. The abrasive surface is designed to catch and break apart pills through friction. On silk, it will pull individual threads and create snags that are impossible to repair invisibly.
What to use instead:
- A fine-tooth cashmere comb. The teeth are closely spaced and designed to lift pills off the surface without disturbing the underlying fibers.
- A single-blade safety razor used with extreme care. Hold it at a shallow angle and work in one direction only. This is a last-resort option for small areas.
- A fabric comb with rounded teeth. These glide across the surface and snip pills free rather than pulling at them.
The key principle with delicates: work slowly and check constantly. After every few strokes, stop and examine the fabric under good lighting. If you see any pulled threads or thinning, stop immediately and switch to an even gentler method. For cashmere specifically, our guide on using a fabric shaver on cashmere goes into more detail on why most power tools are a bad idea for this fiber.
If the pilling is severe and the garment is valuable, consider taking it to a professional knitwear repair service. They have specialized tools and the experience to handle delicate fibers without causing collateral damage.
Common Mistakes That Damage Clothes During Pilling Removal
Even with the right tool, technique errors can ruin a garment. These are the most frequent problems people run into.
Pressing too hard with the shaver. This is the number one mistake. When you push the shaver down into the fabric, you force the fibers into the blade guard slots. The blades then cut the fabric itself, not just the pills.
You end up with thin patches or outright holes. The shaver should rest lightly on the surface. Gravity does most of the work.
Using a dull or damaged blade. A clogged or dull blade doesn't cut pills cleanly. It pulls and tugs at fibers, which can distort the knit structure and leave a rough, uneven surface. Replace blades or clean the shaver head regularly.
Most manufacturers recommend cleaning after every use and replacing blades every six to twelve months with regular use.
Working on wrinkled fabric. If the garment isn't laid flat and smooth, the shaver will catch folds and cut through multiple layers. Always smooth the section you're working on before starting. Stretch it taut with one hand if needed.
Over-shaving the same area. Going over and over the same spot thins the fabric. Once the visible pills are gone, move on. The remaining faint texture is normal knit structure, not pilling.
Using the wrong side of a stone. Some pumice stones have a coarse side and a fine side. The coarse side is meant for heavy pilling on sturdy fabrics. Using it on anything medium-weight or delicate will abrade the surface fibers and leave the fabric looking fuzzy in a different way.
Skipping the test patch. Always try your chosen method on an inconspicuous area first. Inside a seam allowance, the bottom hem, or the back of a collar. If the fabric responds well, proceed.
If it snags, pills differently, or changes texture, stop and try a gentler approach.
How to Prevent Pilling So You Don't Have to Keep Removing It
Removing pills is reactive. Preventing them saves you time, money, and the gradual thinning that repeated treatments cause. Here's what actually works.
Wash clothes inside out. This is the single most effective step. When the outer surface of the fabric doesn't rub against other garments or the drum of the washing machine, friction drops dramatically. It's simple and it works on everything from t-shirts to hoodies.
Use a mesh laundry bag for knits and delicates. The bag contains the garment and limits how much it can move around during the wash cycle. Less movement means less friction between fibers. A mesh bag costs a few dollars and extends the life of your knits noticeably.
Choose the right wash cycle. Use cold water and the delicate or hand-wash setting. Hot water softens synthetic fibers, making them more likely to break free and pill. Aggressive spin cycles create more friction.
Gentle is always better for knitwear.
Skip the dryer when possible. Tumble drying generates enormous friction. Hang-drying or flat-drying eliminates that entirely. You'll also avoid the heat damage that weakens fibers over time, which ties into the pilling cycle.
Our article on getting lint off clothes in the dryer covers more on how dryer habits affect fabric condition.
Use a liquid detergent made for delicates. Powder detergents can be abrasive. Formulas like Woolite are designed to clean without agitating fibers. Less agitation means fewer loose surface fibers and less pilling.
Reduce friction in high-wear areas. This is more of a lifestyle fix, but it matters. Tight straps, rough seams against knit fabric, and carrying bags on the same shoulder every day all accelerate pilling in specific spots. Rotating how you wear and carry things distributes the wear more evenly.
Freeze new synthetic garments before first wear. This sounds odd, but there's logic to it. Freezing can stiffen loose surface fibers, making them less likely to work free during the first few washes. Place the garment in a sealed plastic bag and leave it in the freezer overnight.
It's not a miracle fix, but some textile care guides recommend it for polyester and acrylic pieces.
Fabric Shaver vs. Sweater Stone vs. Razor — Which Tool Is Actually Best
Let's compare the three most common removal methods head to head. Each has a sweet spot, and knowing which to reach for saves you from experimenting on a garment you care about.
| Factor | Electric Fabric Shaver | Sweater Stone / Pumice | Safety Razor |
|---|---|---|---|
| Speed | Fast, covers large areas quickly | Moderate, requires manual effort | Slow, best for small spots |
| Best for synthetics | Excellent | Good | Fair |
| Best for natural knits | Good (light pressure) | Very good | Good with care |
| Best for delicates | Poor, too aggressive | Fair on sturdy delicates | Good on small areas |
| Risk of damage | Moderate if misused | Low | Moderate, blade can snag |
| Average cost | $8 to $30 | $5 to $15 | Essentially free |
| Learning curve | Very low | Low | Moderate, requires steady hand |
The electric shaver wins for most people and most jobs. It's fast, consistent, and easy to use. If you only buy one tool, this is it. Just make sure it has a blade guard and an adjustable head.
That's what prevents the snagging and cutting issues.
The sweater stone is the best natural option. There's no blade involved, so there's almost no risk of cutting the fabric. It works through gentle abrasion. The downside is it takes more physical effort and it wears down over time.
You'll need to replace it after several uses.
The safety razor is a backup tool, not a primary one. It works for spot-treating small areas, but it's hard to maintain even pressure across a large garment. And one slip with the blade means a visible cut in the fabric.
If you're dealing with a mix of garments, having both a shaver and a stone gives you coverage for every fabric type. Our guide on [how to get fuzz off a sweater](https://pillingnomore.com/how to-get-fuzz-off-a-sweater/) walks through which method to use for specific scenarios.
What It Costs — Tool Prices, Time Investment, and When It's Worth It
Let's talk numbers. Fabric pilling removal is one of the cheaper garment care tasks you can do at home, but it's worth knowing what you're getting into.
Tool costs:
- Basic electric fabric shavers start around $8 to $12. These are single-speed models with a small head and a USB or battery power source.
- Mid-range shavers with adjustable speed, a larger head, and a rechargeable battery run $15 to $25.
- Premium models with multiple blade guards, stronger motors, and longer battery life can reach $30 or slightly more.
- Sweater stones cost $5 to $15 depending on brand and size.
- Safety razors are essentially free if you already own one, or $1 to $3 for disposables.
- Mesh laundry bags cost $3 to $10 for a set.
Time investment:
Lightly pilled garment: 5 to 10 minutes.
Moderately pilled sweater: 10 to 20 minutes.
Heavily pilled fleece jacket or blanket: 20 to 40 minutes.
The time adds up if you're doing a whole pile of garments. But compared to replacing those clothes, it's almost nothing. A decent cashmere sweater costs $80 to $200 or more.
Spending fifteen minutes with a $10 tool is a good trade.
When it's worth doing yourself:
- The garment is worth at least $20 to $30
- You own or will use the tool more than once
- The fabric isn't extremely delicate
When to go instead:
- The garment is a high-end designer piece or heirloom
- The fabric is severely damaged beyond just pilling
- You've never done it before and the garment would be hard to replace
Professional knitwear repair or de-pilling services typically charge $15 to $40 per garment depending on severity and fabric type. For a single expensive piece, that's reasonable. For a closet full of worn sweaters, buying a shaver and doing it yourself pays for itself quickly.
How to Deal With Heavy Pilling on Fleece, Activewear, and Synthetic Knits
Heavy pilling on synthetic fabrics is a different beast. The pills are often dense, matted, and cover large areas. But synthetics are also the most durable fabrics to work with, so you can be more aggressive.
Use an electric shaver with a large head. Cover more ground per pass. Work in long, sweeping strokes across the fabric. Don't linger in one spot.
Keep the shaver moving to avoid thinning any single area.
For fleece jackets, work in sections. Do one panel at a time. The front left, front right, back, then sleeves. This keeps you organized and prevents you from missing spots.
Fleece pills heavily along the sides and under the arms. Give those areas extra attention.
Activewear with heavy pilling needs a two-pass approach. First pass with the shaver on a higher speed to knock down the bulk of the pills. Second pass on a lower speed to clean up what's left. Polyester and nylon athletic fabrics can handle this without issue.
If the pilling is extreme, consider trimming first. Use small scissors to snip off the largest, most matted pills before using the shaver. This prevents the shaver from getting clogged and gives you a cleaner finish. It adds a few minutes but makes the shaver's job much easier.
Frequently Asked Questions
Can you use a fabric shaver on a couch?
Yes, but with caution. Upholstery fabric varies widely in durability. Test a hidden area first, like the back or underside of a cushion.
Use light pressure and a low speed setting. Loosely woven or delicate upholstery fabrics can snag. Our guide on using a fabric shaver on a couch covers fabric-specific advice.
Does fabric pilling mean my clothes are low quality.
Not necessarily. Pilling is caused by fiber length, fabric construction, and friction, not just quality. Even premium cashmere pills because the fibers are short and soft.
Synthetic blends pill more than long-staple natural fibers regardless of price. It's a normal part of garment wear.
How often should you remove pilling from clothes.
Whenever it bothers you visually. There's no set schedule. Some people de-pill every few months as part of seasonal wardrobe maintenance.
Others only do it before donating or selling garments. Just don't over-shave the same area repeatedly, as that thins the fabric over time.
Will pilling come back after you remove it.
Yes, if the same friction and washing conditions continue. Removal fixes the symptom, not the cause. Washing inside out, using mesh bags, and air-drying will slow the recurrence.
But most knits will eventually pill again through normal wear.
Is a lint roller the same as a fabric shaver.
No. A lint roller only picks up surface lint and loose fibers. It won't remove embedded pills that are tangled into the fabric.
A fabric shaver cuts or abrades the pills off at the base. For actual pilling, you need a shaver, stone, or comb. Lint rollers are a good final step after de-pilling, though.
Can you remove pilling by hand without any tools.
You can pick off individual pills by hand, but it's tedious and ineffective for anything beyond a few spots. Tweezers work for isolated pills on delicate fabrics where you don't want to risk a tool. For any meaningful area, a proper tool is worth the small investment.