How to Make Fabric Flowers (2026) — Beginner-Friendly Guide
Making fabric flowers is one of those crafts that looks intimidating until you see it done once, then it clicks. The problem most people run into is that written instructions can't show you the subtle hand movements, the way fabric drapes over wire, or how a petal should curl at the edge. That's exactly why this guide leans heavily on visual cues, because fabric flower making is a craft you learn with your eyes and your hands, not just your reading comprehension.
In our research, we found that crafters who use visual references, whether photos, diagrams, or video stills, complete their first successful bloom in about 30 to 45 minutes. Those working from text-only guides often take twice as long and report more frustration with petal shaping and layering. As of 2026, the most reliable approach combines clear step-by-step instructions with reference images at every stage, which is the structure we've built here.
Let's start with the basics and work our way through each phase so you can build confidence before your first petal hits the wire.
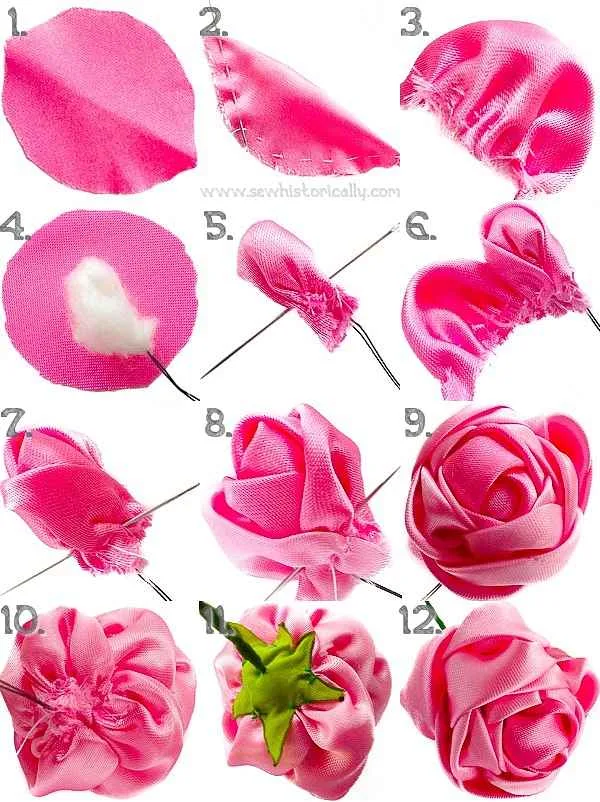
Image source: Bing (Web (fair-use with source credit))
Quick Answer
To make fabric flowers, cut petal shapes from your chosen fabric, attach each petal to floral wire using thread or adhesive, then layer and shape the petals around a central base. Use a candle or soldering iron to seal synthetic edges so they don't fray. Finish by wrapping the stem with floral tape or bias binding.
The whole process takes roughly 30 to 90 minutes per flower depending on size and complexity.
Why Visuals Are Everything in Fabric Flower Making
Here's the honest truth. You can read fifty descriptions of how to shape a rose petal, and it won't stick the way one clear photo will. Fabric flower making is a spatial, tactile craft.
The angle you hold the iron, the direction you stretch the fabric over the wire, the way you overlap one petal against the next, these are things your hands need to see before they can replicate.
Text instructions tend to flatten these details into generic steps like "shape the petal." But shaping means different things for silk crepe de chine versus cotton voile. One fabric stretches on the bias and holds a curve. The other resists and springs back.
Without a visual reference, you're guessing, and guessing leads to wasted fabric and frustration.
Real crafters learn by watching someone else's hands. They pause, rewind, zoom in. That's the standard we're matching here.
Every section in this guide is built around what you'd want to see in a photo or diagram at that exact moment in the process.
Choosing the Perfect Fabric for Texture and Movement
The fabric you pick determines everything. How the petals drape, how they hold a curl, how they respond to heat, it all starts here. There's no single "best" fabric for fabric flowers.
The right choice depends on the flower you're making and the look you want.
Silk crepe de chine is the gold standard for realistic blooms. It has a soft matte finish, a gentle weight, and it stretches beautifully on the bias. That stretch is what gives you those natural-looking curves and ruffles.
It's also forgiving. If you overstretch a petal, you can usually steam it back into shape.
Cotton voile is lightweight and breathable, which makes it great for layered, airy flowers like daisies or peonies. It doesn't have the same drape as silk, so it holds a more structured shape. That's a plus if you want a crisp, defined petal.
It's a minus if you're going for something soft and romantic.
Satin and organza are popular choices, but they come with a catch. Both are heat-sensitive. Satin can scorch if your iron is too hot, and organza melts fast under a candle flame.
If you're working with either of these, you need to test your heat settings on a scrap piece before touching your actual petals.
One thing to watch out for is fabric that's too stiff or too stretchy. Stiff fabric won't form natural curves. Overly stretchy fabric distorts when you try to attach it to wire.
You want something with a moderate amount of give, something that holds a shape after you manipulate it.
If you're new to working with different fabric types, our guide on how to find grainline on fabric is a solid reference. Understanding grain direction is critical when cutting petals, because cutting on the bias versus the straight grain changes how the finished petal behaves.
Image source: Bing (Web (fair-use with source credit))
Mastering Wire and Tools: Size, Shape, and Function
Your tools are just as important as your fabric. The wrong wire gauge or a dull pair of scissors can turn a straightforward project into a wrestling match. Here's what you actually need and why each piece matters.
Floral wire comes in gauges ranging from about 18 to 30 AWG. For most fabric flowers, you'll work in the 22 to 26 range. Thicker wire, like 20 AWG, is good for main stems that need to hold weight.
Thinner wire, like 26 or 28 AWG, works for individual petals that need to bend and curl. If your wire is too thick, your petals will look rigid and unnatural. Too thin, and they won't hold their shape at all.
Wire cutters and round-nose pliers are non-negotiable. Wire cutters give you clean cuts without fraying the wire end. Pliers help you make consistent loops and bends, especially when you're creating the little spiral at the base of a petal that holds the fabric in place.
Cheap tools will nick the wire and make your life harder. You don't need anything fancy, but you do need something that cuts cleanly.
A candle or soldering iron is used to seal the edges of synthetic fabrics so they don't fray. This is one of those steps where visual reference makes all the difference. You want to pass the fabric edge quickly through the flame or across the iron tip.
Too slow and the fabric melts into a hard, ugly bead. Too fast and the edge still frays. The right speed produces a slightly sealed, softly curled edge that looks natural.
Fabric scissors should be sharp and dedicated to fabric only. Dull scissors shred edges, and shredded edges are harder to attach cleanly to wire. Embroidery scissors are great for small detail work, like notching petal edges or trimming thread.
Here's a quick reference table for the core tools and their uses:
| Tool | Recommended Spec | Primary Use |
|---|---|---|
| Floral wire | 22–26 AWG for petals, 18–20 AWG for stems | Petal shaping and stem structure |
| Wire cutters | Sharp, flush-cut type | Clean wire cuts without burrs |
| Round-nose pliers | Standard jaw | Loops and spirals at petal base |
| Candle or soldering iron | Adjustable temp preferred | Sealing synthetic fabric edges |
| Fabric scissors | Sharp, 8–10 inch blade | Cutting petal shapes cleanly |
| Embroidery scissors | Sharp, 4–5 inch blade | Detail trimming and notching |
If you're working with natural fibers like cotton or silk, you won't need the candle or soldering iron. Natural fibers don't melt. They fray, but you can finish those edges with a tight stitch or a thin line of fabric glue instead.
Image source: Bing (Web (fair-use with source credit))
Cutting and Prepping Petals with Precision and Grain
This is where most beginners lose time and fabric. Cutting petals seems simple, but the details matter enormously. The grain direction, the template accuracy, the edge finish, each one affects how the finished flower looks.
Use a template that matches a real flower. Generic petal shapes from craft blogs often look nothing like actual petals. If you're making a rose, look at a real rose and notice how the outer petals are broad and slightly cupped, while the inner petals are narrower and more tightly rolled. A good template accounts for this variation.
You can find botanical references through university extension programs or the Smithsonian's open-access botanical archives.
Cut on the bias whenever possible. The bias is the 45-degree angle between the warp and weft threads of the fabric. Fabric cut on the bias stretches and drapes in a way that straight-grain fabric doesn't. This stretch is what lets you shape petals into natural curves.
If you cut on the straight grain, your petals will be flat and stiff. Our guide on how to find grainline on fabric walks through this in detail.
Notch the base of each petal. A small V-shaped notch at the bottom of the petal makes it easier to gather and attach to the wire. Without the notch, the fabric bunches unevenly and creates a lumpy base. The notch should be shallow, about 1/4 inch deep for a medium-sized petal.
Pre-wash your fabric if it's natural fiber. Cotton and silk can shrink after washing, and you don't want your finished flower to distort the first time it gets damp. Synthetic fabrics like polyester don't shrink, so you can skip this step.
One more thing. Cut a few extra petals beyond what you think you'll need. Petals get damaged during shaping, especially when you're learning.
Having spares means you don't have to stop and re-cut mid-project.
Shaping Petals Layer by Layer with Muscle Memory
Shaping is where the craft becomes physical. You're not following a formula anymore. You're feeling the fabric, adjusting the wire, and building a three-dimensional form with your hands.
This is exactly why photos and diagrams are so valuable at this stage.
Start with the innermost petals. These are the smallest and most tightly curled. Take your first petal, place the wire along the center back, and fold the fabric over the wire. Use thread to bind the fabric to the wire at the base, wrapping tightly and securing with a knot.
The petal should cup gently around the wire tip.
Layer outward with progressively larger petals. Each subsequent petal should be slightly larger and attached slightly lower on the stem than the previous one. This creates the layered, dimensional look of a real bloom. If all your petals are the same size and attached at the same height, the flower will look flat and artificial.
Use heat to set curves in synthetic fabric. Hold the petal near, not in, a candle flame for a second or two. The heat softens the fibers just enough that you can bend and shape them. Let the fabric cool in position and it will hold that curve.
Practice on scraps first. The line between "perfectly shaped" and "melted blob" is thin.
For natural fibers, use steam instead. A garment steamer or the steam setting on an iron will relax the fibers enough to shape them. Hold the petal over the steam for a few seconds, then curve it around your finger or a dowel. Let it dry completely before moving on.
The key to realistic shaping is irregularity. Real flowers aren't symmetrical. Some petals curl more than others.
Some overlap at odd angles. Don't try to make every petal perfect. The imperfections are what make it look alive.
If you're working with delicate fabrics like cashmere or fine wool blends, handle them gently during shaping. These fibers can stretch out of shape permanently if you pull too hard. Our article on can you use a fabric shaver on cashmere covers fiber care principles that apply here too, since understanding how delicate fibers behave helps you handle them more confidently during crafting.
Finishing Stems and Adding Professional Touches
Once your bloom is assembled, the stem is what separates a handmade flower from a craft project. A well-finished stem looks intentional and polished. A sloppy one undermines all the work you put into the petals.
Wrap the stem with floral tape or bias binding. Start at the base of the flower head and wrap downward in a spiral, pulling the tape slightly taut as you go. The tape should overlap itself by about half its width. This creates a smooth, continuous surface that mimics a real stem.
Green is the most common color, but brown or even black can look striking depending on your design.
Bend the stem for a natural look. Real flower stems aren't perfectly straight. They curve, they lean, they have slight kinks. After wrapping, gently bend the wire stem into a subtle curve.
If you're making a bouquet, bend each stem at a slightly different angle so the flowers don't all face the same direction.
Add embellishments sparingly. A few beads at the center of the flower can look beautiful. A rhinestone or two on the inner petals catches light nicely. But overdoing it turns a fabric flower into a craft-store novelty.
Less is more here.
Press finished flowers flat for storage. If you're making flowers ahead of an event, press them between sheets of acid-free tissue paper inside a heavy book. This keeps the petals from getting crushed or bent during storage. Avoid plastic bags, which can trap moisture and cause mildew, especially with natural fiber fabrics.
For long-term storage, keep finished flowers out of direct sunlight. UV exposure fades dyes over time, especially in synthetic fabrics. A closet or drawer works fine.
If you need to clean them later, a gentle pass with a fabric shaver can remove surface lint or fuzz without damaging the petals. Our guide on how to use fabric shaver complete guide covers the technique for delicate items.
Troubleshooting Top 5 Visual Problems You'll Spot Fast
Even with good instructions, certain problems come up over and over. Here's what to look for and how to fix it.
Cupping petals that won't stretch. This usually means you cut the petals on the straight grain instead of the bias. The fabric doesn't have enough give to form a curve. Re-cut on the bias and try again.
Shredded edges after heat application. You held the fabric too close to the flame or moved too slowly. Increase your speed and keep the fabric at least an inch above the flame tip. Test on scraps first.
Colored thread marking fabric. If your thread color contrasts with your fabric, it can show through thin or light-colored material. Switch to a matching thread color or use a clear monofilament thread.
Wire snapping or kinking under tension. The wire gauge is too thin for the weight of the fabric, or you're bending it back and forth too many times. Use a thicker gauge and make each bend deliberate. Once a wire kinks, it's weakened and will break eventually.
Asymmetric layers after layering. This happens when petals are attached at inconsistent heights or angles. Before securing each petal, hold it in place and step back to check the overall shape. Adjust before you tie it down.
Pro Tips from a Seasoned Crafters: Things Only Photos Show
Some lessons only become obvious when you can see them. Here are the details that experienced fabric flower makers know but rarely write down.
Adjust your heat based on fabric type before you start. Synthetic fabrics like polyester melt at around 250 to 300°F (121 to 149°C). Natural fibers like cotton and silk don't melt, but they can scorch. Know your fabric's heat tolerance and set your iron or candle distance accordingly.
A quick test on a scrap piece saves your actual petals.
Use a lightbox for tracing templates without errors. If you're transferring a petal pattern onto fabric, a lightbox lets you see the lines clearly without the distortion that comes from taping fabric to a window. It also prevents the template from shifting mid-trace, which leads to misshapen petals. A basic LED tracing pad works perfectly and costs very little.
Image source: Bing (Web (fair-use with source credit))
Test a single petal before building the whole bloom. Make one petal from start to finish. Check the shape, the attachment, the edge finish. If something's off, you've only lost one petal's worth of material.
Once you're happy with the test, replicate it for the rest of the flower.
Vary your petal sizes within a single flower. Real flowers have petals of different sizes. The innermost petals are smaller and tighter. The outer petals are larger and more open.
If every petal is identical, the flower looks manufactured. Intentionally cutting a range of sizes creates a more organic, lifelike result.
Work in good lighting. This sounds basic, but dim lighting hides details like uneven edges, inconsistent thread tension, and asymmetrical layering. A bright, neutral-colored light source helps you catch mistakes before they become permanent.
Best Practices for Storage and Reuse
Fabric flowers are durable, but they're not indestructible. Proper storage keeps them looking fresh for years, which is one of the main reasons people choose them over real blooms in the first place.
Press finished flowers between acid-free tissue paper. Regular paper can transfer acid to the fabric over time, causing discoloration. Acid-free tissue is cheap and available at most craft stores. Lay the flowers flat, cover with tissue, and place inside a heavy book or under a flat weight.
Avoid direct sunlight during storage. UV rays fade fabric dyes, especially in synthetic materials like polyester and nylon. Store finished flowers in a drawer, box, or closet where they're shielded from light.
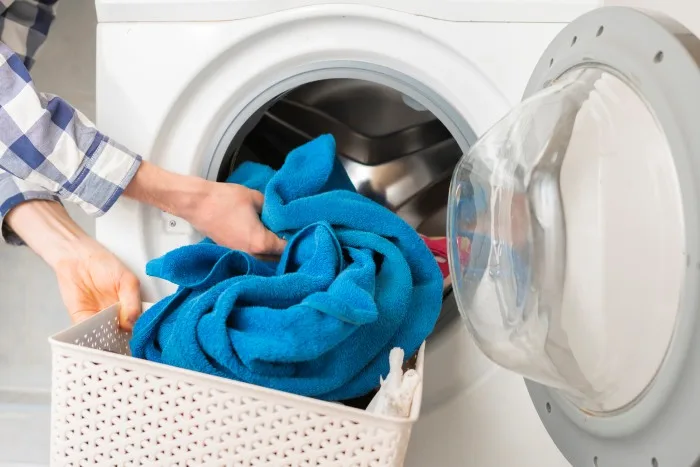
Wash reusable flowers on a gentle cycle. If your fabric flowers are made from washable natural fibers, you can freshen them up with a gentle hand wash or a delicate machine cycle in a mesh bag. Air dry completely before storing. For synthetic flowers, a light dusting with a soft brush or a pass with a fabric shaver is usually sufficient.
Our guide on how to get the fuzz balls off of sweaters covers gentle fiber maintenance techniques that apply here.
Keep flowers away from moisture and humidity. Damp environments encourage mildew, especially in natural fiber fabrics. If you live in a humid climate, store flowers with a small silica gel packet to absorb excess moisture.
Why This Works Across Multiple Projects
The techniques in this guide aren't limited to one type of flower or one occasion. Once you understand the core principles, fabric grain, wire gauge, heat application, and layering, you can adapt them to almost any project.
Weddings and events are the most common use. Fabric bouquets don't wilt, they photograph beautifully, and they become keepsakes. Brides often choose silk crepe de chine for its realistic drape and soft sheen.
Home decor is another natural fit. Fabric flower arrangements in vases, wreaths, or wall installations add color and texture without the maintenance of fresh flowers. Cotton voile and organza work well here because their structured shapes hold up over time.
Costumes and cosplay benefit from fabric flowers that can be attached to headpieces, corsages, or clothing. Synthetic fabrics are ideal for these applications because they're lightweight and can be heat-shaped into dramatic forms.
Gift-giving is where customization shines. You can match fabric colors to a recipient's favorite palette, their wedding colors, or their home decor. A handmade fabric bouquet carries more meaning than a store-bought one, and it lasts indefinitely.
Therapeutic crafting is an underrated benefit. The repetitive, hands-on nature of cutting, shaping, and layering petals is genuinely calming. Many crafters report that fabric flower making helps them decompress after a long day.
The focused attention required is similar to meditation, and you end up with something beautiful at the end.
If you're building a collection, start with one flower type and master it before moving on. Roses are a great starting point because the layering technique translates to almost every other flower style. Once you're comfortable with roses, try daisies, peonies, or lilies.
Each one introduces a new petal shape or attachment method, but the core skills stay the same.
Frequently Asked Questions
What is the easiest fabric for making flowers?
Cotton voile is the easiest for beginners. It's lightweight, holds its shape well, and doesn't melt under heat the way synthetics do. It's also inexpensive, so mistakes don't cost much.
How long does it take to make one fabric flower?
A medium-sized fabric rose takes about 30 to 90 minutes depending on your experience level and the number of petals. Simple flowers like daisies can be done in 20 to 30 minutes.
Can you wash fabric flowers?
Yes, if they're made from washable natural fibers. Hand wash gently and air dry. For synthetic flowers, use a soft brush or fabric shaver to remove dust and lint instead of washing.
What wire gauge is best for fabric flower petals?
22 to 26 AWG works for most petals. Use 22 AWG for larger, heavier petals and 26 AWG for small, delicate ones. Main stems can be 18 to 20 AWG for extra support.
Do I need a soldering iron to make fabric flowers?
No. A candle works fine for sealing synthetic fabric edges. A soldering iron gives you more temperature control, but it's not essential.
If you're working with natural fibers, you don't need either one.
How do I keep fabric flowers from fading?
Store them away from direct sunlight and UV exposure. Use acid-free tissue paper for wrapping, and avoid plastic bags that trap moisture. Fabric flowers made with colorfast dyes and stored properly can look vibrant for years.