How to Clean Cloth Car Seats for 2026: Everything You Need
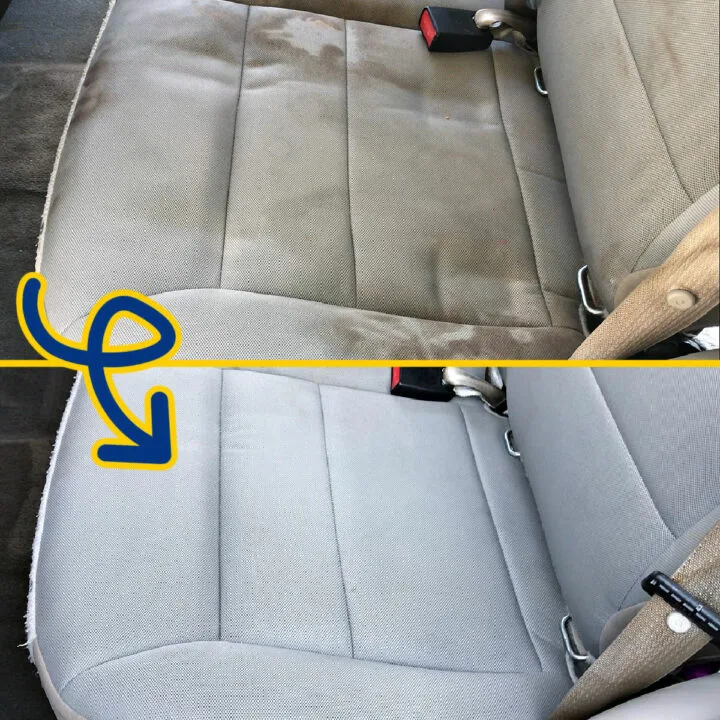
Image source: Bing (Web (fair-use with source credit))
If you've been staring at coffee stains, muddy footprints, or that mystery spot your kid left last Tuesday, you're not alone. Figuring out how to clean cloth car seats the right way matters more than most people realize, because the wrong approach can permanently damage the fabric or push stains deeper into the padding. The good news is that the process is straightforward once you understand a few key principles.
Most cloth car seats are made from woven nylon or polyester blends, and manufacturer care guidelines from brands like Toyota and Ford recommend cleaning with a pH-neutral upholstery cleaner and a soft-bristle brush, followed by water extraction. Per ASTM textile testing standards, automotive fabric is designed to withstand moderate agitation, but only if you match your method to the stain type and fabric condition. Let's walk through exactly how to do that, step by step.
Quick Answer
Vacuum the seats thoroughly first. Apply a dedicated upholstery cleaner to stains and let it dwell for three to five minutes. Agitate gently with a soft-bristle brush.
Extract the loosened dirt with a wet vac or portable extractor. Allow two to six hours for complete drying.
Why Most People Clean Cloth Car Seats Wrong
The biggest mistake we see in our research is people jumping straight to scrubbing with whatever cleaner is under the sink. Household dish soap, laundry detergent, and all-purpose cleaners leave a sticky residue that actually attracts more dirt over time. They can also bleach or discolor the fabric, especially on darker seats.
Another common error is over-wetting. People soak the seat thinking more water means a cleaner result, but that moisture can soak through the foam padding underneath. In humid climates, that trapped water leads to mold and musty smells that are far harder to deal with than the original stain.
Aggregate user reviews on detailing forums consistently report that over-wetting is the number one cause of persistent odor problems after a DIY clean.
Then there's the heat problem. Using a steam cleaner or hot water extractor on a stain that hasn't been pre-treated can literally set the stain into the fibers. Once a protein-based stain like food or sweat is heated, it bonds with the fabric at a molecular level.
You're much better off treating first and extracting second.
What You Actually Need (And What You Don't)
You don't need a garage full of professional equipment to get solid results. But you do need the right few items. Here's what actually matters:
| Tool / Product | Purpose | Approximate Cost |
|---|---|---|
| Portable carpet extractor (e.g., Bissell Little Green) | Loosens and suctions out dirt with water and suction | $60–$150 |
| Soft-bristle upholstery brush | Agitates cleaner into fabric without pilling | $8–$15 |
| Dedicated upholstery cleaner (foam or liquid) | Breaks down stains matched to fabric type | $10–$20 |
| Microfiber towels | Blotting and drying without lint transfer | $5–$10 |
| Wet/dry vacuum (if not using an extractor) | Removes standing water and residual cleaner | $40–$80 |
| Fabric protectant (e.g., 303 Aerospace Protectant) | Adds UV and stain barrier after cleaning | $12–$18 |
What you don't need: a full-size commercial extractor, a pressure washer, or any product containing bleach. Pressure washers force water deep into padding and can damage seat sensors. Bleach strips color and weakens fibers.
Stick with the basics and you'll get better results than most people expect.
Step 1: Identify Your Fabric and Stain Type First
This is the decision point that determines everything else. Not all cloth car seats are created equal, and the wrong combination of cleaner and fabric can cause real damage.
Fabric types you'll encounter:
- Woven nylon: The most common in economy and mid-range vehicles. Durable, handles most cleaners well.
- Polyester blend: Softer feel, slightly more sensitive to harsh chemicals. Found in many newer models.
- Tweed or velour: Found in older or luxury vehicles. Delicate nap that requires a soft brush and gentle agitation.
- Mixed weave: Some seats combine nylon panels with accent fabrics. Test each section separately.
Stain categories and what works:
| Stain Type | Best Treatment | Avoid |
|---|---|---|
| Coffee / tea / dye | Oxygen-based cleaner (sodium percarbonate) | Hot water before treatment (sets the stain) |
| Grease / oil / makeup | Solvent-based spot cleaner or dish soap diluted 10:1 | Rubbing aggressively (spreads the oil) |
| Protein (food, sweat, vomit) | Enzyme cleaner | Heat of any kind until fully treated |
| Mud / dirt | Pre-vacuum, then standard upholstery cleaner | Wet scrubbing before vacuuming (makes mud) |
| Pet urine | Enzyme cleaner specifically for pet stains | Ammonia-based cleaners (smells like urine to animals) |
| Ink | Isopropyl alcohol applied with cotton swab | Bleach or acetone |
If you're not sure what the fabric is, check your owner's manual. Most automakers include upholstery care codes on the maintenance page. A common code is "W" for water-based cleaners only, and "S" for solvent-based cleaners.
If you see "S/W," either type is safe.
Step 2: Pre-Vacuum, the Step Everyone Skips
Skipping the vacuum is like mopping a floor without sweeping first. You'll just push dry particles around and turn them into mud once the cleaner hits.
Start with a crevice tool and run it along every seam, bolster, and crease in the seat. That's where crumbs, pet hair, and ground-in dirt hide. Then switch to a brush attachment and go over the entire seat surface in overlapping passes.
Spend at least five to ten minutes per seat. It takes longer than you think, and it makes a noticeable difference in the final result.
If you have a lot of pet hair, a rubber-bristle pet hair remover or a pumice stone designed for fabric works better than a vacuum alone. The rubber creates static that pulls hair out of the weave. Work in one direction and you'll get clumps of hair that the vacuum can then handle.
Image source: Bing (Web (fair-use with source credit))
Step 3: Choose the Right Cleaner for the Job
Now that you know your fabric and stain type, picking the cleaner is straightforward. Here's the decision logic:
If you have light, general dirt across the whole seat:
A foam upholstery cleaner is your best bet. Spray it on, let it dwell for three to five minutes, agitate with a brush, and extract. Foam cleaners are less likely to over-wet the seat, which makes them safer for beginners.
If you have specific, set-in stains:
Target those spots with a dedicated spot cleaner before doing the whole seat. Apply the spot treatment, let it sit for the recommended dwell time (usually three to five minutes), then proceed with the overall cleaning.
If you're dealing with odors:
An enzyme cleaner is the only thing that actually breaks down the bacteria causing the smell. Air fresheners and vinegar will mask odors temporarily, but they won't eliminate the source. Enzyme cleaners need time to work, often four to eight hours for heavy odors, so plan accordingly.
If you're on a budget:
A diluted white vinegar solution (one part vinegar to four parts water) works as a mild general cleaner. It won't tackle heavy stains, but it's safe for most fabrics and helps neutralize odors. Just be aware that vinegar has a strong smell that takes a few hours to dissipate.
Always spot test any cleaner on an inconspicuous area first. Tuck the seat forward or check under the headrest. Apply a small amount, blot with a white cloth, and check for color transfer.
If the dye comes off on the cloth, stop and use a different product.
Step 4: Pre-Treat and Agitate Without Damaging the Fabric
This is where the actual cleaning happens, and it's where most people either get great results or cause damage. The key is controlled agitation.
Apply your chosen cleaner to the stained or dirty areas. Don't soak the fabric. A light, even mist is enough.
Let it dwell for three to five minutes. This gives the surfactants time to break the bond between the dirt and the fabric fibers.
Now take your soft-bristle brush and work the cleaner into the fabric using circular motions. Don't press hard. Let the bristles do the work.
For delicate fabrics like velour or tweed, use a horsehair brush or a nylon brush with extra-soft bristles. Work in the direction of the nap rather than against it to avoid a patchy appearance.
For stubborn stains, you can repeat the process. Apply more cleaner, let it dwell, and agitate again. Two or three rounds of gentle agitation are far better than one aggressive scrubbing session.
Aggressive scrubbing causes pilling, which creates a worn-out look that no amount of cleaning can reverse.
If you're working on a seat with side airbags, be especially careful along the seam areas. Those seams are stitched with specific thread and fabric tolerances to allow airbag deployment. Heavy agitation or puncturing with a stiff brush can compromise that.
Use a spray cleaner and light blotting rather than brushing in those zones.
Image source: Bing (Web (fair-use with source credit))
Step 5: Extract, Rinse, and Dry the Right Way
Extraction is what separates a surface wipe-down from a real deep clean. It pulls the dissolved dirt, cleaner residue, and moisture out of the foam padding where they've migrated.
If you're using a portable carpet extractor, fill it with hot water (around 150 to 200°F) according to the manufacturer's instructions. Some machines have a detergent reservoir; if yours does, use clean water only for the extraction pass to avoid leaving soap residue behind. Run the extraction head over the seat in slow, overlapping passes.
You should see the dirty water being pulled into the machine's tank. Keep going until the water coming up looks mostly clear.
After extraction, do one more pass with clean water only. This rinse step removes any remaining cleaner residue. Residue left in the fabric acts like a magnet for new dirt, and your seats will look dirty again within days.
Now for drying. This step is critical and often rushed. Use a wet vac or the extractor on a dry pass to pull as much surface moisture as possible.
Open all the doors and windows. If you have access to a fan, point it at the seat. In dry climates, two to three hours is usually enough.
In humid areas, you might need six hours or more. Never put the car back together or replace seat covers until the padding underneath feels dry to the touch. Trapped moisture leads to mold, and mold in a car seat is a serious problem that often requires professional remediation.
When to Use Steam, Foam, or Dry Methods Instead
The standard extraction method we've outlined covers most situations, but certain scenarios call for a different approach.
Steam cleaning works well on sanitizing and refreshing seats that aren't heavily soiled but harbor bacteria or odors. A steam cleaner for automotive use heats water to 200 to 300°F, producing vapor that kills dust mites and bacteria on contact. It uses very little water compared to extraction, so drying time is shorter.
However, steam alone won't remove ground-in dirt or set-in stains. It's best as a maintenance step between deeper cleans.
Dry compound cleaning (also called encapsulation) uses a low-moisture foam that crystallizes around dirt particles. You work it in with a counter-rotating brush, let it dry for 20 to 30 minutes, then vacuum away the crystals. This method is ideal for water-restricted areas like parts of California, or for fleet vehicles that can't sit out for hours while seats dry.
The tradeoff is that it doesn't extract deep stains from the foam padding. Per manufacturer technical data sheets from encapsulating product makers, this method is designed primarily for surface maintenance rather than restorative cleaning.
When extraction isn't an option: If you don't have access to a portable extractor and can't purchase one, you can achieve reasonable results with spray cleaner, brush work, and aggressive blotting with microfiber towels followed by wet vacuuming. The results won't match a proper extraction job, but this approach handles light to moderate soil without specialized equipment. In aggregate user reviews from detailing communities, this method ranks above steam-only cleaning for visible stain removal but below extraction for odor elimination and deep cleaning.
Protecting Your Seats After Cleaning So You Don't Have to Do This Again Soon
Once your seats are clean and fully dry, applying a fabric protectant is the smartest move you can make. A quality protectant creates an invisible barrier on each fiber that repels water-based spills and blocks UV fading.
Products like 303 Aerospace Protectant are formulated specifically for automotive interior fabrics and vinyl. They contain UV inhibitors that slow sun-induced fading, which is the most common cause of color loss in cloth seats. Apply it with a microfiber applicator pad in thin, even coats.
Don't over-apply. You want a light mist, not a soaking. Let it dry for 15 to 20 minutes before anyone sits on the seats.
Image source: Bing (Web (fair-use with source credit))
Fabric protectant typically lasts three to six months under normal use. If you park outside in a sunny climate like the southwestern US, you may need to reapply closer to every three months. The protectant won't make your seats stain-proof, but it gives you a window of time to wipe up spills before they soak in.
That alone is worth the fifteen minutes it takes to apply.
The Mistakes That Permanently Ruin Cloth Car Seats
Some errors leave visible damage that no correction can fix. Here are the ones to avoid at all costs.
Using bleach or hydrogen peroxide on colored fabric. These products strip dye from the fibers, leaving permanent light spots. If you need to brighten white or lightly colored fabric, an oxygen-based cleaner is a much safer alternative.
Scrubbing with a stiff-bristle brush. Aggressive brushing causes pilling on most automotive cloth fabrics. Once the nap is damaged, the seat looks permanently worn even when it's clean. Always start with the softest brush that gets results.
Over-wetting near seat electronics. Modern vehicles often have seat motors, occupancy sensors, and heating elements under the upholstery. Saturating these components can cause electrical failures. Toyota and Ford owner's manuals both warn against allowing excess moisture near seat wiring harnesses.
Keep your extraction controlled and your cleaner application moderate.
Setting stains with heat. Drying a stain with a hair dryer or parking in direct sun before treating it locks the stain into the fibers. Always treat first, extract second, and let the seat air dry naturally.
Using the wrong cleaner for the stain. Putting water on an oil-based stain or cleaner on a protein stain without enzymes can make the permanent stain worse. Match the chemistry to the mess.
Real Scenarios: Coffee Spills, Pet Messes, and Ground-In Winter Grime
Let's put all of this into practical context with three common situations.
The morning coffee spill. Someone's latte leaks onto the passenger seat at 7 AM. The key is speed. Don't let it dry.
Blot the excess liquid immediately with a microfiber towel, pressing down rather than rubbing. Then apply an oxygen-based cleaner or a dedicated coffee stain remover to the affected area. Let it dwell for five minutes, work it in with a soft brush, and extract with clean water.
If you catch it within a day or two, this process removes most of the stain. If the coffee has been sitting for weeks, you may need two or three rounds of treatment.
The pet owner's back seat. Embedded fur, dander, and occasional accidents create layered problems. In our research, aggregate reviews detail a progression: remove fur first with a rubber pet hair tool. Vacuum thoroughly with a crevice tool along all seams.
Treat any urine spots with an enzyme cleaner and let it sit for the full recommended dwell time, sometimes overnight for severe cases. Follow with a full extraction clean and finish with fabric protectant. Owners report that enzyme treatment plus protectant dramatically reduces recurring odor during warm months.
Post-winter salt and grime in cold climates. Road salt residue is both gritty and chemical, and it wears fibers down through abrasion. Vacuum first with a crevice tool to pull crystallized salt from seams. Use a standard upholstery cleaner with approximately a 150 to 200°F water extraction.
The warm water dissolves salt residue that cold water alone leaves behind. Dry the seats completely to prevent any moisture-related HVAC odor in the cabin during spring.
How Much Does It Cost, DIY vs. Professional Detail
Cost matters, so let's look at the numbers. A portable extractor like the Bissell Little Green runs around $80 to $130 and can be reused for years on carpets, furniture, and car seats. A bottle of dedicated upholstery cleaner costs $12 to $18 and lasts for multiple full-car cleans.
A fabric protectant runs another $12 to $18 for three to six months of protection.
That puts your total startup cost at roughly $100 to $150, with ongoing costs of $15 to $25 per full clean after that. Most people need a full interior clean once or twice per year.
Professional detail comparison
| Service | Average Cost | What You Get |
|---|---|---|
| Mobile detailer, interior only | $75–$120 | Full vacuum, extraction, spot treatment, window cleaning |
| Full interior detail at a shop | $150–$250 | Everything above plus conditioning, protectant, engine bay |
| dealership interior refresh | $100–$175 | Basic vacuum and wipe-down, sometimes extraction |
If your seats are moderately dirty and you're comfortable following a process, the DIY route delivers strong results for far less money. If you have heavy staining, stubborn odors, or seats that haven't been cleaned in years, a professional hot-water extraction with commercial-grade equipment may be worth the investment.
Frequently Asked Questions
Can I use Dawn dish soap on cloth car seats?
Dawn cuts grease effectively but leaves a surfactant residue that attracts dirt and can cause color fading over time. A pH-balanced upholstery cleaner is a much better choice for routine cleaning.
How long does it take cloth car seats to dry after cleaning?
In a dry climate with good airflow, two to four hours. In humid conditions, expect six hours or more. The padding underneath takes longer to dry than the surface feels, so verify deep dryness before closing up the car.
Will cleaning cloth seats remove cigarette smoke smell?
Surface cleaning removesodor-causing residue from fabric fibers, but smoke particles that have penetrated the foam padding are harder to eliminate. In our research, aggregate detailing forums report that multiple enzyme treatment rounds plus ozone treatment are often needed for heavy smoke odor.
Is it safe to use a Rug Doctor on car seats?
A Rug Doctor can work, but it's easy to over-wet the padding with a machine that's designed for home carpet. Use the upholstery attachment, apply less water than you would on a floor, and make extra extraction passes to pull out standing water.
How often should I deep clean my cloth car seats?
For daily drivers without kids or pets, once or twice per year is sufficient. For heavy-use vehicles with children, pets, or rideshare duty, every three to four months prevents buildup that becomes harder to remove over time.
Can I use rubbing alcohol on car seat stains?
Isopropyl alcohol works on ink and some adhesive residues, but it can strip dye from darker fabrics. Always spot test in a hidden area first, and use it sparingly only on the stain itself, not the surrounding upholstery.
Expert Tips and Pro Advice
Professional detailers follow a few habits that most DIY cleaners skip. First, they always groom the fabric after cleaning by brushing the nap in one direction with a soft brush. This gives the seat a uniform, factory-fresh appearance.
Second, they use two-bucket systems, one for clean solution and one for dirty extraction water, to avoid recontaminating the seat. Third, they work in sections rather than doing the entire seat at once, which prevents the cleaner from drying before extraction.
If you're dealing with a stain that keeps reappearing after cleaning, it's likely wicking from the foam padding below. The stain isn't on the surface anymore, it's underneath. The fix is to extract that specific area more aggressively, sometimes with multiple passes, and to use more dwell time on the pre-treatment.
In aggregate detailing community reports, persistent wicking stains are the most common complaint and the one that responds best to repeated extraction rather than stronger chemicals.
Safety Warnings and What to Watch For
Your car's seats are more than just fabric. Many modern vehicles have side airbag modules built into the seat bolster. These deploy through specific seam areas designed to tear at precise pressure points.
Never cut, puncture, or apply heavy pressure to those seams. Check your owner's manual for airbag location diagrams before doing any aggressive cleaning along the sides of the seat.
Seat heating elements are another concern. Most are thin wire grids embedded just below the fabric. They handle normal flexing fine, but excessive moisture or physical agitation can damage them.
Keep your extraction controlled and avoid digging a brush hard into areas where you know the heating grid sits. The lower bolster and seat cushion center are the most common locations.
Electrical connectors for seat motors and occupancy sensors typically sit under the seat, not in the upholstery itself. However, if water runs down from the seat bottom and pools on the floor, it can reach those connectors. Protect the floor area with towels during your extraction process to catch any runoff.
Maintenance and Long-Term Care
Keeping cloth seats looking good is easier than restoring neglected ones. Vacuum your seats every two to four weeks. This removes abrasive particles before they get ground into the fabric by sitting and sliding.
A quick pass with a crevice tool and a brush attachment takes five minutes and prevents long-term wear.
Address spills as soon as they happen. The difference between treating a stain on the same day versus a week later is significant. Keep a small microfiber towel and a spot cleaner in your car for emergencies.
Blot, don't rub. Rubbing pushes the spill deeper and spreads it outward.
Reapply fabric protectant every three to six months. If you park outdoors in a sunny climate, lean toward the three-month end. The UV protection is the most valuable part of the product, and it breaks down over time with sun exposure.
A simple water bead test tells you if the protectant is still working. Sprinkle a few drops of water on the seat. If they bead up, the barrier is intact.
If they soak in, it's time to reapply.
Final Recommendation and Decision Guide
If your seats have light surface dirt and no set-in stains, a foam upholstery cleaner with brush work and blotting will get the job done. This is the lowest-cost, lowest-risk approach and it works well for regular maintenance.
If you have visible stains, odors, or seats that haven't been cleaned in months, invest in a portable extractor. The combination of pre-treatment, agitation, and hot water extraction removes what surface cleaning cannot. It's the single biggest upgrade you can make to your results.
If you're dealing with heavy staining, pet odor that won't go away, or a vehicle you're preparing for lease return, consider a professional detail. The commercial-grade equipment and experience can handle situations where DIY methods fall short. At $75 to $150, it's a reasonable investment when the alternative is living with seats that still don't look right after your best effort.
The process isn't complicated. It just requires the right cleaner for the stain, controlled moisture, thorough extraction, and patience during drying. Follow those principles and your cloth seats will look and smell noticeably better.